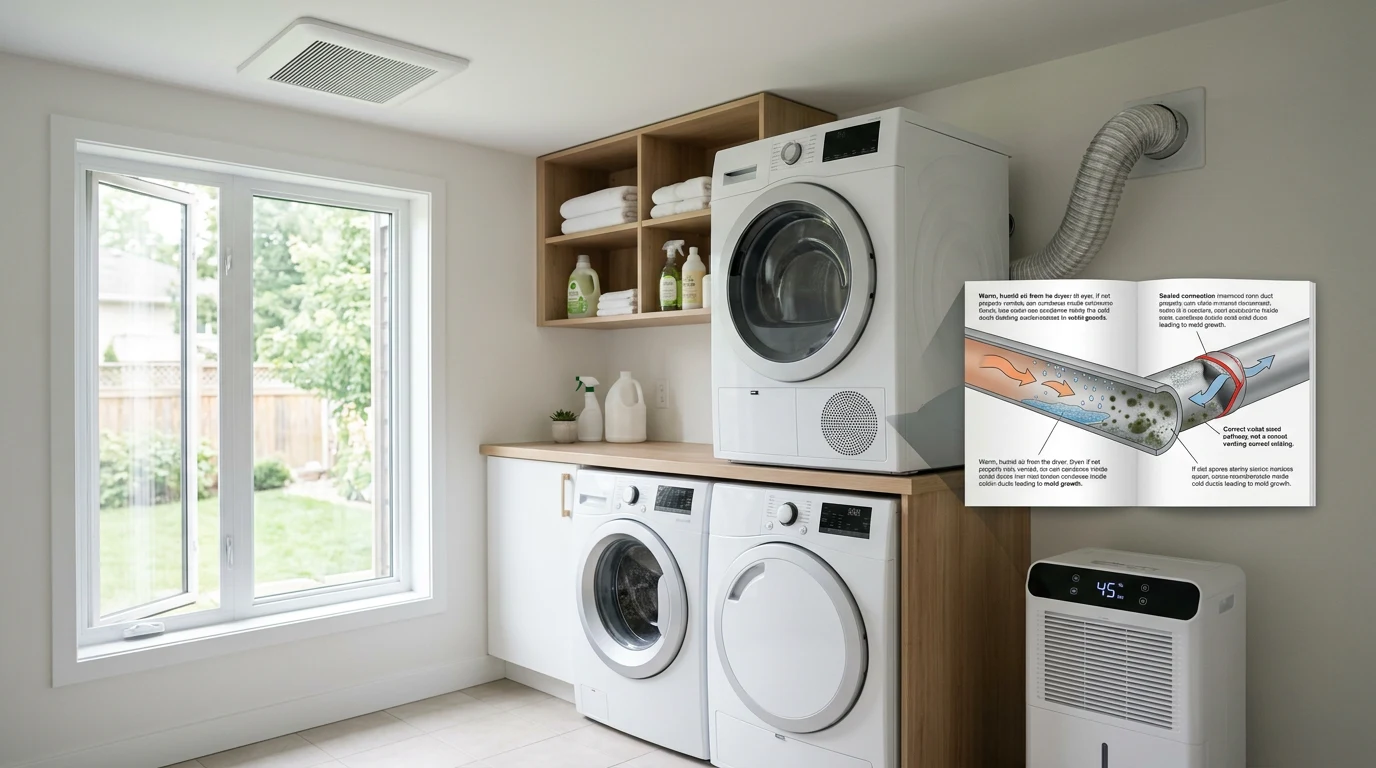
A single dryer load releases 4 to 6 pints of water as it heats and evaporates moisture from wet clothing. When that moisture vents safely outside through a properly connected duct, no problem. When the vent is disconnected, blocked, or routed into the attic, that water vapor has nowhere to go but into your home’s structure — and the result is often severe mold growth that costs thousands to remediate.
Dryer vent problems are one of the most overlooked causes of attic mold and hidden moisture damage. The fix is straightforward and inexpensive, but most homeowners never check their dryer vent system until mold is already established.
How a Dryer Vent Causes Mold
An average household runs the dryer 4 to 5 loads per week. Each load generates approximately 5 pints of water vapor at temperatures between 125 and 135 degrees Fahrenheit. Over the course of a month, that is roughly 10 to 12 gallons of hot, moist air passing through the vent system.
When this system fails, the moisture goes directly into your living space or building structure. According to the EPA, controlling indoor moisture sources is fundamental to mold prevention — and a malfunctioning dryer vent is one of the largest controllable moisture sources in any home.
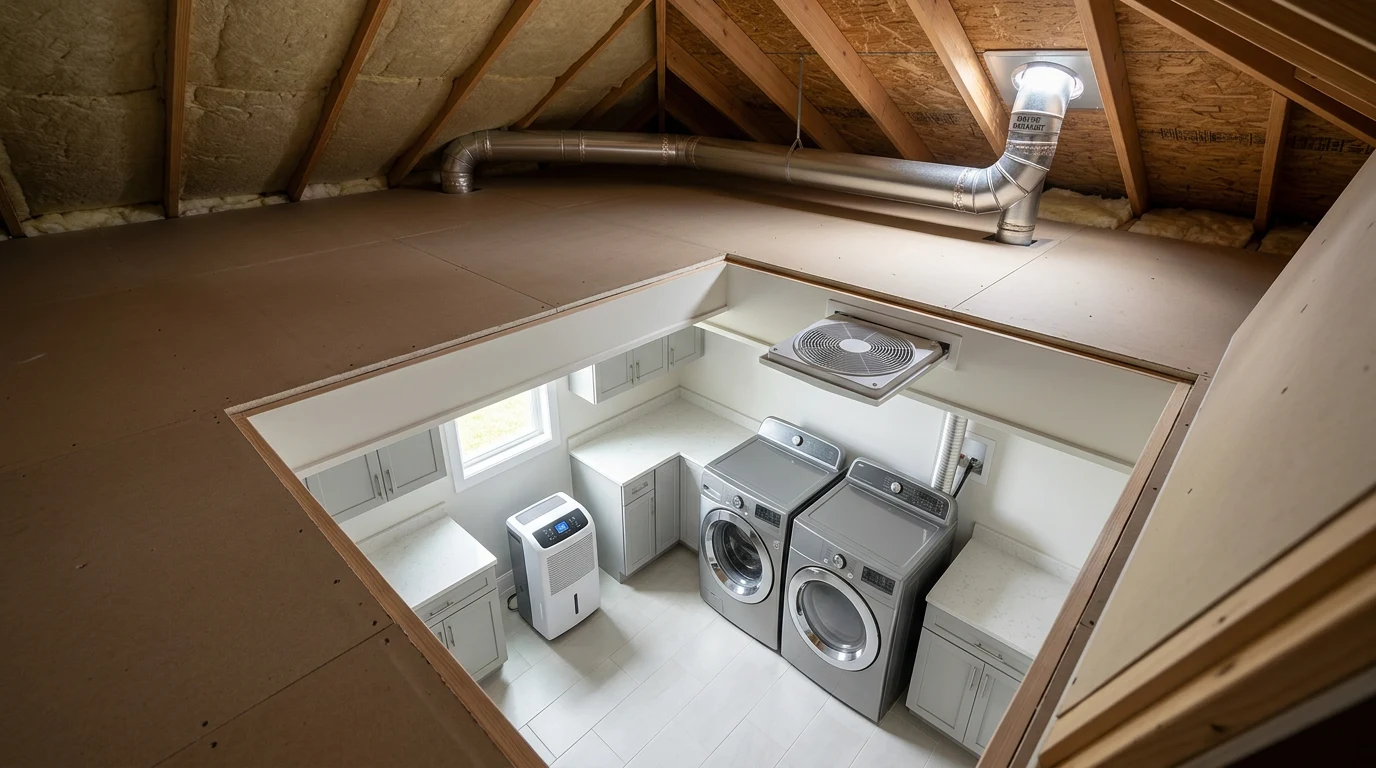
Attic Venting: The Mold Factory
Some homes — particularly those built before modern building codes or those with amateur renovations — have dryer vents that terminate in the attic rather than outside. This is one of the worst possible configurations for mold:
- Hot, moist air enters a cool space: Attics are not heated or cooled. In winter, attic temperatures can drop below freezing. When 130-degree moist dryer air hits cold roof sheathing, massive condensation forms — like breathing on a cold mirror.
- Moisture accumulates on wood surfaces: The condensation coats roof sheathing, rafters, and trusses. These wood surfaces absorb the moisture and remain wet for hours between dryer cycles.
- Mold colonizes within weeks: Consistently damp wood in a dark, unventilated space is ideal for mold. Within 2 to 4 weeks of regular dryer use with attic venting, mold colonies can establish. Within a few months, extensive mold coverage of attic surfaces is common.
- Frost forms in winter: In cold climates, dryer moisture freezes on roof sheathing surfaces. When temperatures warm — during a thaw or in spring — all that accumulated frost melts at once, drenching the attic. This sudden moisture event can cause explosive mold growth.
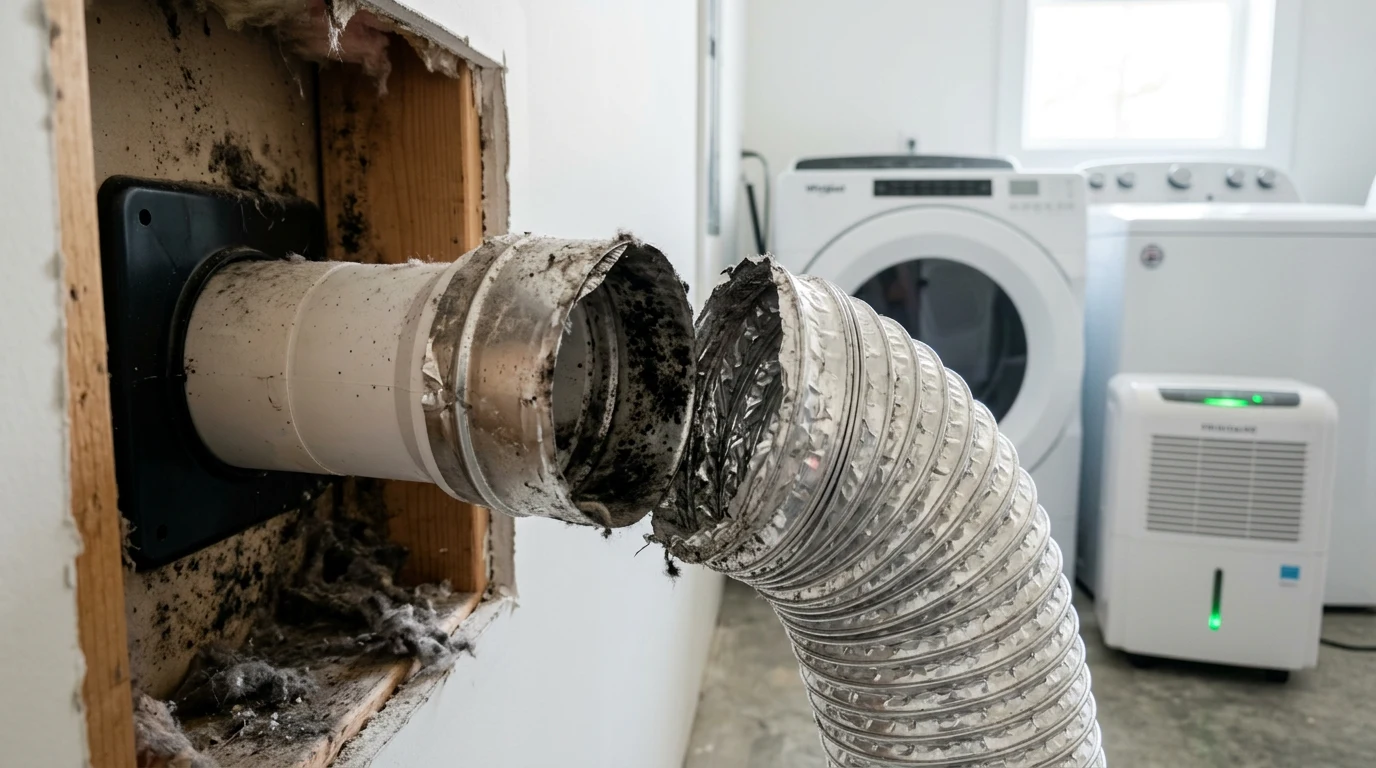
Disconnected Vents: The Hidden Problem
Even when the dryer vent is designed to exhaust outside, connections can fail. Flexible foil or vinyl duct is particularly prone to disconnection because it tears easily, sags under its own weight, and pulls apart at joints.
A disconnected dryer vent pumps moisture directly into whatever space the duct passes through — typically a wall cavity, crawl space, or attic. Because the disconnection is hidden behind a wall or in an attic, homeowners often do not discover the problem until mold is already widespread.
Signs Your Dryer Vent Has a Problem
Watch for these warning signs that indicate your dryer vent system is compromised:
- Clothes take longer than one cycle to dry: If a normal load takes more than 45 to 60 minutes, the vent is likely partially blocked. Restricted airflow means moisture is not being exhausted efficiently.
- Excessive humidity in the laundry room: Windows fogging, damp feeling in the air, or condensation on surfaces during dryer operation indicates that moist air is escaping into the room rather than going outside.
- Hot dryer exterior: If the outside of the dryer feels unusually hot during operation, restricted airflow is trapping heat. This is also a fire hazard.
- Musty smell in the laundry area or attic: Mold growth from vent moisture produces distinctive musty odors. If the smell worsens on laundry days, the vent system is the likely culprit.
- Visible lint around the vent connection: Lint accumulation behind or around the dryer indicates a loose connection or leak in the duct.
- No airflow at the exterior vent cap: Go outside while the dryer is running and check the exhaust vent. You should feel strong, warm airflow. If air movement is weak or absent, the duct is blocked or disconnected.
- Condensation on attic surfaces: If you see moisture, frost, or water stains on attic roof sheathing, check whether the dryer vent passes through or terminates in the attic.
The Right Way to Vent a Dryer
A properly configured dryer vent system prevents mold and reduces fire risk. Here are the requirements:
Use Rigid or Semi-Rigid Metal Duct
The duct material matters enormously for both mold prevention and safety:
- Rigid smooth-wall aluminum or galvanized steel (best): Smooth interior surface minimizes lint buildup. Rigid sections cannot sag, kink, or disconnect. This is the only duct type that meets building code in most jurisdictions.
- Semi-rigid aluminum (acceptable for short transitions): Can be used for the short section between the dryer and the wall connection. Must be properly supported and fully extended (no compression).
- Flexible foil duct (avoid): The accordion-style ridges trap lint, restrict airflow by 20% to 30%, and tear easily. Not code-compliant in many areas. If your current installation uses foil flex duct, replace it.
- Vinyl or plastic duct (never): Not code-compliant anywhere for dryer venting. Vinyl melts at dryer exhaust temperatures and is a fire hazard. If you find vinyl duct, replace it immediately.
Vent Directly to the Outdoors
- Through an exterior wall: The shortest, most direct route to outside is always best. Every foot of duct and every elbow reduces airflow and increases lint accumulation.
- Never into the attic, crawl space, or garage: Building codes universally require dryer vents to terminate outside the building envelope. Venting into any enclosed space is a moisture and fire hazard.
- Use a proper exterior vent cap: The cap must have a damper that opens when the dryer runs and closes when it stops. This prevents outdoor air, pests, and rain from entering the duct. Avoid caps with screens — screens collect lint and restrict airflow.
Follow Length and Elbow Limits
- Maximum recommended duct length: 25 feet for rigid duct (per most building codes and manufacturer guidelines)
- Deduct 5 feet for each 90-degree elbow: A run with two 90-degree elbows has an effective maximum of 15 feet
- Deduct 2.5 feet for each 45-degree elbow: Use 45-degree elbows instead of 90-degree elbows where possible to improve airflow
- Keep joints airtight: All duct connections should be secured with metal foil tape (not standard duct tape, which deteriorates in heat). Joints should overlap by at least 1.5 inches.
How to Inspect Your Dryer Vent
A complete dryer vent inspection takes 15 to 20 minutes and should be done at least once per year. Here is how:
Step 1: Check the Exterior Vent Cap
Go outside and locate where your dryer vent exits the house. Start the dryer and verify strong, warm airflow at the cap. The damper should be open during operation. Check for lint buildup around the opening, bird nests, or debris blocking the cap.
Step 2: Inspect Behind the Dryer
Pull the dryer out from the wall. Check the duct connection at the back of the dryer. Look for lint accumulation, crushed or kinked duct, and loose connections. Ensure the duct material is rigid or semi-rigid metal, not foil or vinyl.
Step 3: Check the Duct Route
If possible, trace the duct route from the dryer to the exterior. In many homes, the duct passes through a wall cavity or runs through the attic or crawl space. Look for disconnections, sags, or sections that appear wet or lint-covered. If the duct passes through the attic, verify it exits through the roof or wall — not that it terminates in the attic space.
Step 4: Clean the Duct
Even properly installed ducts accumulate lint over time. Clean the duct annually using a dryer vent cleaning kit — a rotating brush on a flexible rod that you feed through the duct from either end. Kits cost $20 to $40 and pay for themselves by improving dryer efficiency, reducing drying time, and eliminating fire and mold risk.
For long or complex duct runs, professional dryer vent cleaning costs $100 to $170 and includes a complete inspection.
Condensation Inside the Duct: A Hidden Mold Source
In cold climates, the section of dryer duct that passes through unheated spaces (attics, crawl spaces, exterior walls) can develop internal condensation. Hot, moist dryer air cools as it passes through the cold duct, and water droplets form on the interior surface.
This condensation mixes with lint to create a wet, organic paste that is ideal for mold growth. Over time, this buildup restricts airflow further, increasing condensation and creating a self-reinforcing mold and blockage cycle.
Prevention strategies for duct condensation:
- Keep the duct as short as possible — shorter runs mean less time for air to cool
- Insulate duct sections that pass through unheated spaces with R-8 duct insulation
- Ensure the duct slopes slightly downward toward the exterior (1/4 inch per foot) so condensation drains out rather than pooling inside
- Clean the duct annually to remove lint before it mixes with condensation
Indoor Dryer Vent Kits: Do They Cause Mold?
Indoor dryer vent kits redirect dryer exhaust into the living space, typically through a lint trap with a water reservoir. These are marketed as alternatives for homes where exterior venting is difficult. However, they introduce serious mold risk:
- Each load adds 4 to 6 pints of water vapor directly into your home
- Indoor humidity can spike to 70% or higher during dryer operation
- The lint filter does not capture fine particles, degrading indoor air quality
- Gas dryers cannot use indoor vent kits at all (carbon monoxide hazard)
For mold prevention, indoor vent kits should be avoided whenever possible. If exterior venting is truly impossible, run a dehumidifier in the laundry area during and after every dryer cycle, and monitor humidity with a hygrometer to ensure levels drop below 55% within an hour of the dryer stopping.
What to Do If Your Dryer Vent Has Already Caused Mold
If you discover mold related to dryer vent problems, address both the cause and the effect:
- Fix the vent first: Before any mold remediation, repair or replace the vent system so moisture stops entering the space. Otherwise, mold will return.
- Assess the mold extent: If mold covers less than 10 square feet, you may be able to remove it yourself. For larger areas or mold on structural members, consult a professional.
- Dry the space: Run fans and dehumidifiers to bring the affected area below 50% humidity and keep it there for several days before and after mold treatment.
- Check the full remediation process: For attic mold caused by dryer venting, the scope often includes roof sheathing treatment, rafter cleaning, and verification that moisture levels have returned to normal.
Frequently Asked Questions
How often should I clean my dryer vent?
At least once per year. If you have a long duct run (over 15 feet), use your dryer frequently (more than 5 loads per week), or dry heavy items like towels and bedding regularly, clean every 6 months. Signs that cleaning is overdue include longer drying times, lint visible at the exterior vent, and excessive heat on the dryer exterior.

Can I use my dryer vent to heat my house in winter?
This is not recommended for mold prevention or safety. While the warm air may feel pleasant, it carries 4 to 6 pints of moisture per load, fine lint particles, and potentially harmful chemicals from dryer sheets and detergents. The moisture alone can raise indoor humidity to mold-promoting levels within a few loads. Gas dryers also produce carbon monoxide that must vent outside.
Is a dryer vent booster fan worth it?
For duct runs longer than 25 feet (including equivalent length from elbows), an inline booster fan can maintain proper airflow and prevent moisture and lint from accumulating in the duct. These cost $40 to $100 and install within the duct run. They are particularly useful for dryer vents that must travel through long interior wall runs or up through the attic to a roof vent.
How do I know if my dryer vents into the attic?
Start the dryer and check the exterior vent cap. If you feel no airflow outside, the vent may terminate internally. Go into the attic while the dryer is running — you will hear the dryer exhaust and feel warm, moist air if the vent terminates there. You may also see lint accumulation on attic surfaces or moisture stains on the roof sheathing above where the duct ends.
My dryer is in the basement. Can the vent run upward?
Yes, but vertical runs reduce maximum effective length. A vertical run through the house to a roof vent is less efficient than a horizontal run through an exterior wall. If the vertical distance is more than 10 feet, consider a booster fan. Ensure the duct material is rigid metal — flexible duct sags and collects lint in vertical runs, creating blockages faster than horizontal installations.
Frequently Asked Questions
How does a clogged dryer vent lead to attic mold?
A clogged dryer vent causes hot, moist air to back up into the dryer and potentially leak into the surrounding wall cavity, including the attic space. This trapped moisture, combined with the warm temperatures, creates an ideal environment for mold growth on wooden surfaces and insulation in the attic.
What are the early signs that my dryer vent might be causing attic moisture issues?
Early signs include longer drying times for clothes, the top of your dryer feeling excessively hot, or a burning smell from the laundry area. If you notice condensation on attic windows or a musty odor in the attic, these are stronger indicators of moisture problems potentially linked to the dryer vent.
How often should I clean my dryer vent to prevent attic mold?
It is recommended to clean your dryer vent at least once a year, or more frequently if you have a large household, pets, or use your dryer extensively. Regular cleaning ensures proper airflow, preventing moisture buildup that could lead to attic mold.
Can professional dryer vent cleaning really prevent attic mold?
Yes, professional dryer vent cleaning is highly effective in preventing attic mold by thoroughly removing lint and debris that impede airflow. This ensures all moist air is properly exhausted outdoors, eliminating a significant source of humidity that can promote mold growth in your attic.
What kind of mold typically grows in attics due to dryer vent issues?
The most common types of mold found in attics due to moisture from dryer vents are Cladosporium, Penicillium, and Aspergillus. These molds thrive in damp, humid conditions and can appear as black, green, or white fuzzy patches on wood sheathing and insulation.
Besides cleaning, what other maintenance can prevent dryer vent-related attic mold?
Beyond regular cleaning, ensure your dryer vent is properly installed with minimal bends and rigid metal ducting, as flexible plastic ducts are more prone to kinks and lint buildup. Also, verify that the exterior vent hood is not blocked and has a proper damper to prevent backdrafts of cold, moist air.
These statements have not been evaluated by the Food and Drug Administration. This information is not intended to diagnose, treat, cure, or prevent any disease. Content is for informational purposes only and is not medical advice; consult a qualified healthcare provider before starting any supplement. As an Amazon Associate we earn from qualifying purchases.