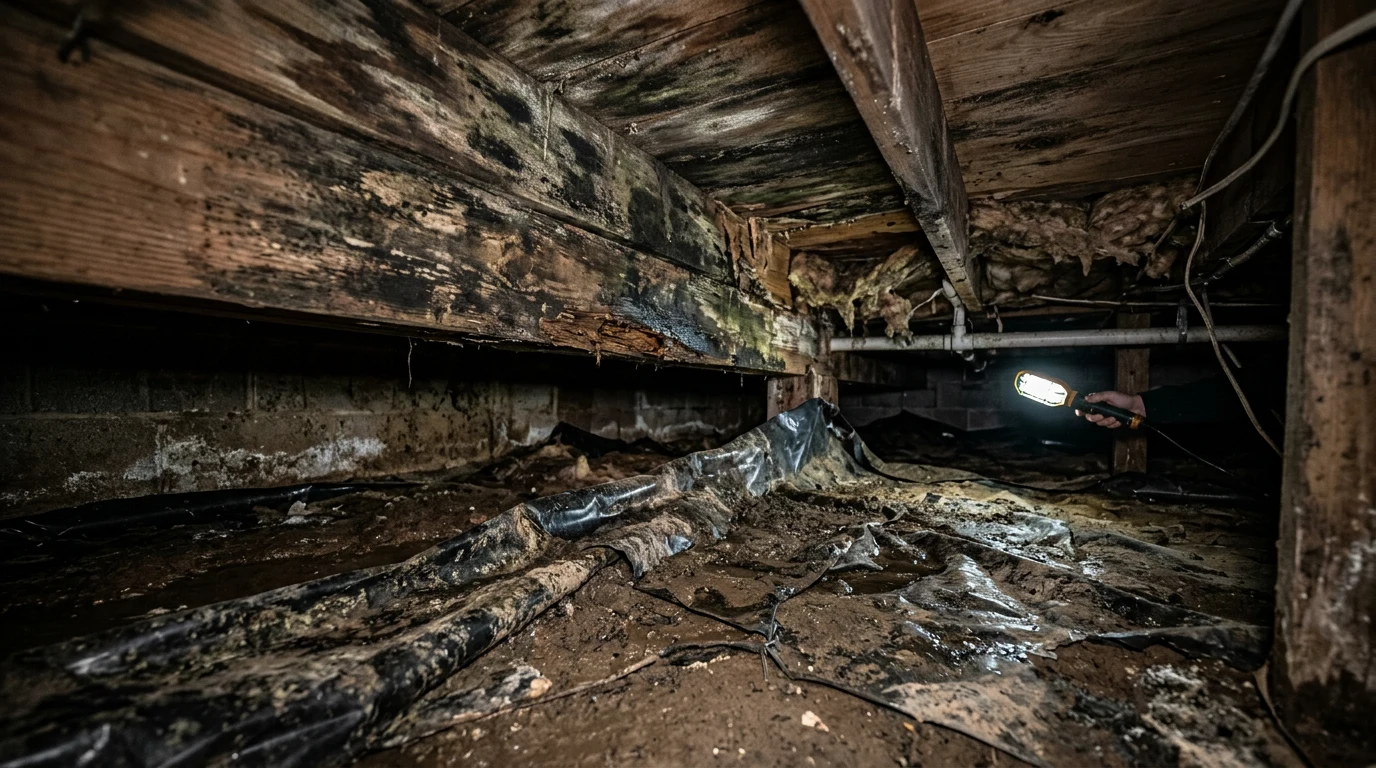
If your home has a crawl space, there is a strong chance it is working against you. Unsealed crawl spaces pull moisture directly from the ground, creating relative humidity levels of 70-90% — the exact conditions mold needs to thrive. A properly installed vapor barrier drops that moisture by up to 80%, and for most homeowners, pays for itself within 2-3 years through reduced energy bills, prevented structural damage, and avoided remediation costs.
This guide breaks down what a crawl space vapor barrier actually does, what materials to use, realistic costs, and why it is one of the highest-ROI investments you can make for mold prevention.
Why Crawl Spaces Are Mold Magnets
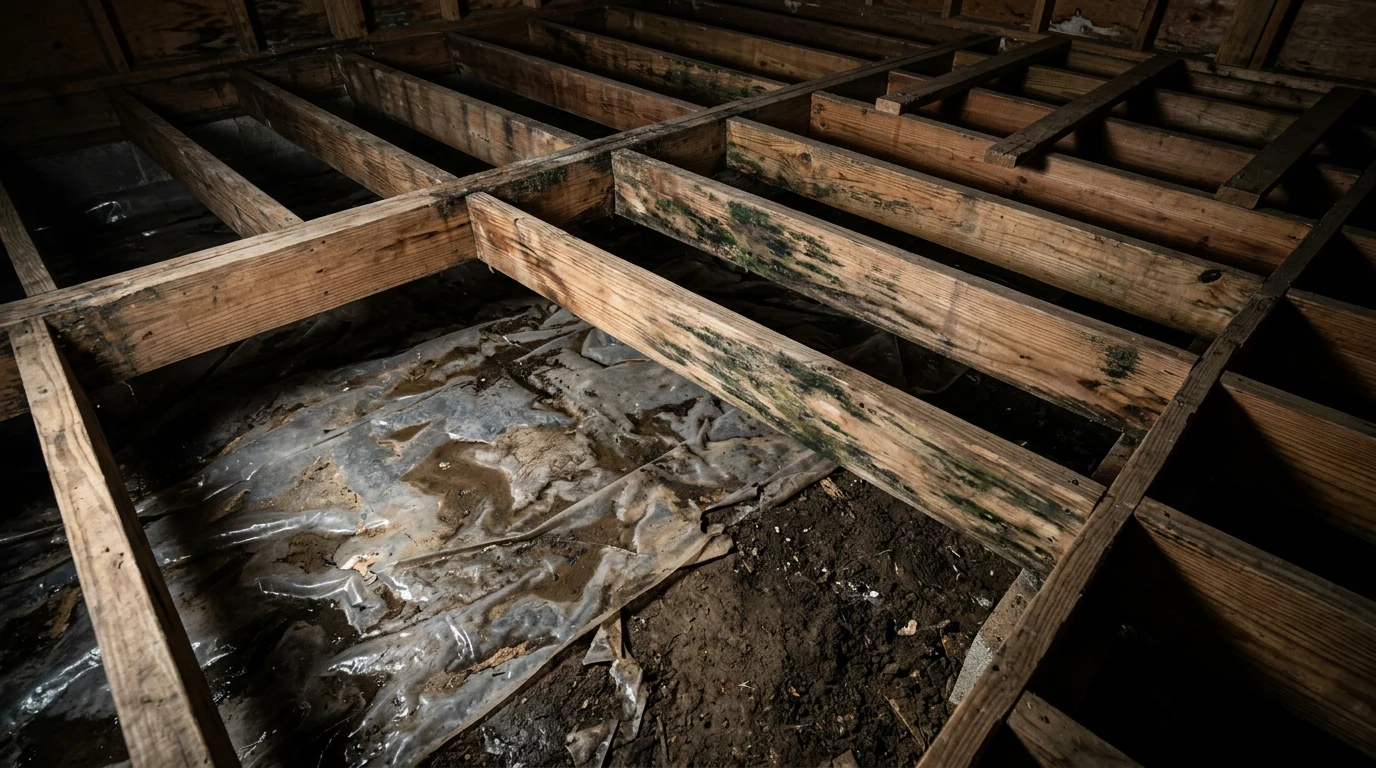
An unsealed crawl space is essentially a direct conduit between the damp ground and the underside of your home. Here is what happens beneath a home without a vapor barrier:
- Moisture evaporates from exposed soil at a rate of 12-16 gallons per day in a typical 1,000 sq ft crawl space
- That moisture rises into floor joists, subfloor, and insulation
- Relative humidity in the crawl space regularly exceeds 70%, the threshold where mold actively colonizes
- Warm air from the crawl space enters the living space through the stack effect, bringing mold spores and musty odors with it
According to building science research, approximately 40% of the air you breathe on your first floor originates from the crawl space. If that space is damp and moldy, you are circulating contaminated air throughout your home every single day.
What a Vapor Barrier Actually Does
A crawl space vapor barrier is a sheet of heavy-duty polyethylene plastic installed over the exposed dirt floor and, in full encapsulation systems, up the foundation walls. Its job is simple: block ground moisture from entering the crawl space airspace.
A properly installed vapor barrier achieves the following:
- Reduces crawl space relative humidity from 70-90% down to 30-50%
- Blocks soil gas and radon from entering the home
- Prevents condensation on cold surfaces like ductwork and pipes
- Protects floor joists and subfloor from moisture damage
- Eliminates the musty smell that signals active mold growth
The key distinction is between a basic ground cover and full encapsulation. A basic ground cover addresses the floor only. Full encapsulation seals the floor, walls, piers, and seams, creating a controlled environment below your home. Full encapsulation is the gold standard for mold prevention.
Choosing the Right Vapor Barrier Material
Not all vapor barriers are equal. The thickness of the polyethylene sheeting determines its durability, puncture resistance, and moisture-blocking effectiveness.
Thickness Guide
- 6-mil polyethylene — The minimum acceptable thickness. Adequate for basic ground covers in low-traffic crawl spaces. Costs $0.05-0.10 per square foot for material only.
- 10-mil polyethylene — Better puncture resistance. Suitable for crawl spaces where occasional access is needed. Costs $0.10-0.20 per square foot.
- 12-mil reinforced polyethylene — Recommended for most installations. Cross-woven reinforcement prevents tearing during installation. Costs $0.15-0.30 per square foot.
- 20-mil reinforced polyethylene — Professional-grade material used in full encapsulation systems. Expected lifespan of 20+ years. Costs $0.25-0.50 per square foot.
For mold prevention specifically, use a minimum of 6-mil polyethylene with sealed seams. If you are investing in full encapsulation, 12-mil or 20-mil reinforced sheeting provides the best long-term value. The material cost difference between 6-mil and 20-mil is only $150-400 for a typical crawl space, but the lifespan difference is dramatic — 5-10 years versus 20+ years.
Full Encapsulation vs. Basic Ground Cover
Understanding the difference between these two approaches is critical for making the right investment decision.
Basic Ground Cover ($500-$1,500)
- 6-mil poly laid over the dirt floor
- Edges overlap by 6-12 inches but may not be sealed
- Vents remain open
- Reduces ground moisture evaporation by 60-70%
- Does not address wall moisture or humidity from vents
- Lifespan: 3-7 years depending on material quality
Full Encapsulation ($2,000-$6,000)
- 12-20 mil reinforced poly covering floor and walls up to 6 inches above grade
- All seams taped with specialized seam tape
- Barrier attached to walls with mechanical fasteners and adhesive
- Foundation vents sealed closed
- Dehumidifier installed to maintain 45-55% relative humidity
- Reduces moisture by up to 80%
- Lifespan: 15-25 years
For homes with existing crawl space mold problems, full encapsulation is the only approach that reliably prevents recurrence. A basic ground cover helps, but it leaves too many moisture pathways open to provide lasting protection.
Realistic Cost Breakdown
The total cost of a crawl space vapor barrier depends on the approach, crawl space size, and whether you hire a professional or do it yourself.
DIY Ground Cover (1,000 sq ft crawl space)
- 6-mil polyethylene sheeting: $50-100
- Seam tape: $15-30
- Utility knife, stakes, gloves: $20-40
- Total: $85-170
Professional Full Encapsulation (1,000 sq ft crawl space)
- 20-mil reinforced vapor barrier material: $250-500
- Seam tape and adhesives: $50-100
- Vent covers and sealant: $100-200
- Crawl space dehumidifier: $800-1,500
- Professional labor (8-16 hours): $800-2,000
- Drainage matting (if needed): $200-500
- Total: $2,200-4,800
The average homeowner spends approximately $3,500 for professional full encapsulation of a standard crawl space. This figure varies significantly based on crawl space accessibility, existing moisture issues, and regional labor rates.
The ROI Case: Why It Pays for Itself
A $3,500 encapsulation investment delivers returns across multiple categories:
- Energy savings: Sealed crawl spaces reduce heating and cooling costs by 15-20%. For a home spending $2,400/year on energy, that is $360-480 in annual savings.
- Avoided mold remediation: The average mold removal cost for a crawl space is $1,500-4,000. One prevented remediation nearly covers the encapsulation cost.
- Structural preservation: Replacing moisture-damaged floor joists costs $5,000-15,000. Vapor barriers prevent the conditions that cause this damage.
- Home value: An encapsulated crawl space adds an estimated 3-5% to home resale value, particularly in humid climate zones.
At $400+ in annual energy savings alone, the payback period is 7-9 years. Factor in one avoided remediation event, and the investment pays for itself in 2-3 years. This makes crawl space encapsulation one of the highest-ROI home improvements available for mold prevention.
Installation Steps for a Basic DIY Vapor Barrier
If your crawl space is dry, accessible, and you are comfortable working in a confined space, a basic vapor barrier is a manageable DIY project. Full encapsulation, however, is best left to professionals.
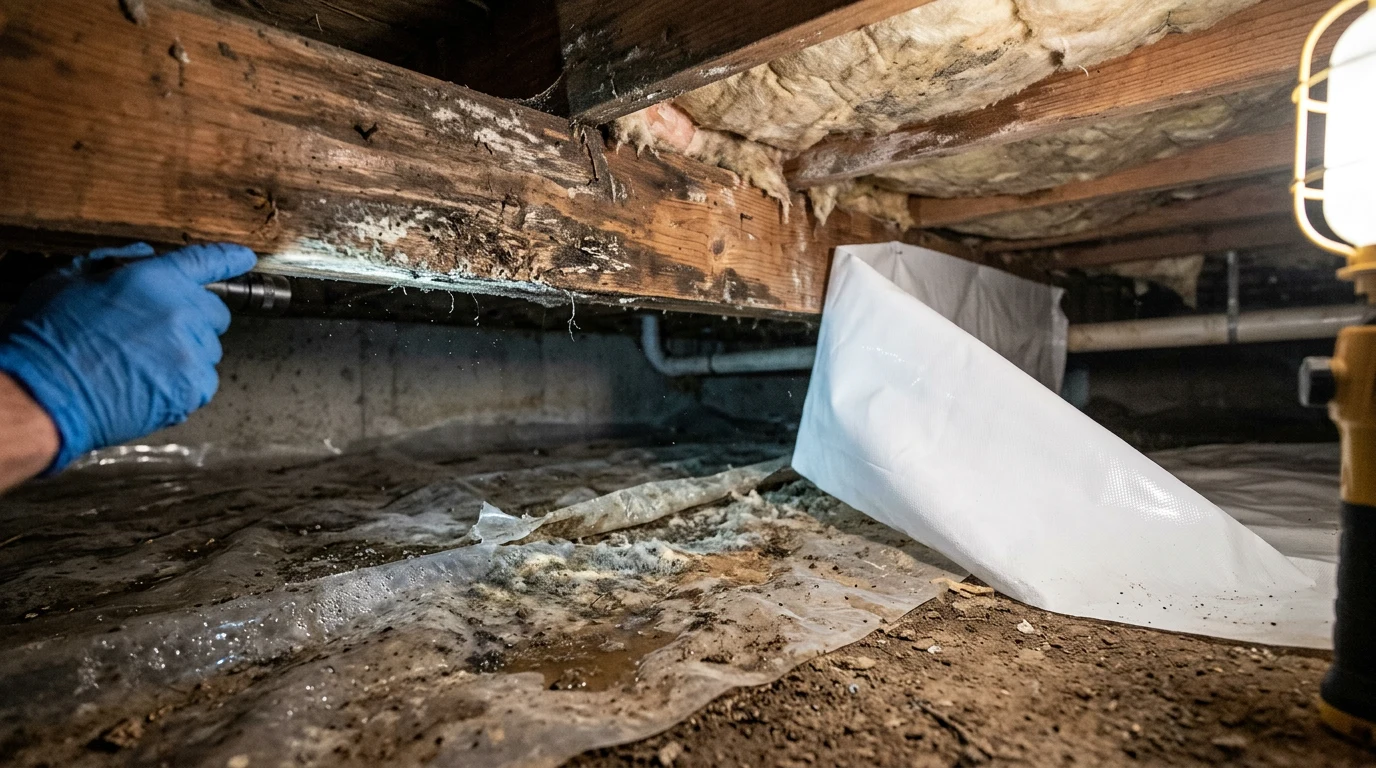
- Inspect and clean: Remove all debris, sharp rocks, and old insulation from the crawl space floor. Address any standing water or active leaks before proceeding.
- Grade the soil: Level high spots and fill low spots where water could pool under the barrier.
- Measure and cut: Measure the crawl space floor area and add 12 inches on each side for wall overlap. Cut the polyethylene sheeting to size.
- Lay the barrier: Starting from the far end, unroll the sheeting across the floor. Run it up the foundation walls at least 6 inches.
- Overlap seams: Where sheets meet, overlap by at least 12 inches and seal with polyethylene seam tape.
- Secure edges: Use landscape stakes or concrete anchors to hold the barrier in place along walls and around piers.
- Seal penetrations: Cut the barrier around support piers and pipes, then seal the cuts with tape.
A basic installation takes 4-8 hours for a 1,000 sq ft crawl space. Work in pairs whenever possible — crawl spaces present safety considerations including limited ventilation, potential exposure to mold, and confined space hazards.
When to Add a Dehumidifier
A vapor barrier alone handles ground moisture, but it does not control humidity from other sources like outdoor air infiltration, plumbing condensation, or seasonal humidity swings. Pair your vapor barrier with a crawl space dehumidifier when:
- You live in a climate zone with average summer humidity above 60%
- The crawl space has a history of mold growth
- You are performing full encapsulation with sealed vents
- Relative humidity in the crawl space exceeds 55% even after barrier installation
Crawl space dehumidifiers are different from household units. They are designed to operate in low-temperature, confined environments and include built-in pumps to drain condensate. A quality crawl space dehumidifier costs $800-1,500 and removes 70-90 pints of moisture per day. Learn more about dehumidifiers for mold prevention.
Signs Your Crawl Space Needs a Vapor Barrier Now
Do not wait for visible mold to take action. These warning signs indicate your crawl space is actively contributing to moisture problems:
- Musty odors in first-floor rooms, especially in warmer months
- Visible condensation on crawl space ductwork or pipes
- Soft or sagging spots in first-floor flooring
- Peeling paint or wallpaper on first-floor walls
- Crawl space relative humidity consistently above 60% (use a $15-20 hygrometer to check)
- Visible mold on floor joists, subfloor, or insulation
- Increased allergy symptoms in household members
- Higher-than-expected heating and cooling bills
If you already see mold in the crawl space, address the existing crawl space mold before installing a vapor barrier. Installing a barrier over active mold growth traps the problem rather than solving it.
Common Mistakes That Undermine Vapor Barriers
Even with a quality vapor barrier, these mistakes can reduce its effectiveness:
- Unsealed seams: Overlapping without taping allows moisture to escape between sheets. Always tape every seam.
- Using material that is too thin: 4-mil plastic tears easily during installation and degrades within 1-2 years. Use 6-mil minimum.
- Ignoring wall moisture: Ground moisture is only part of the equation. Foundation walls wick moisture from surrounding soil. Run the barrier up the walls.
- Leaving vents open after encapsulation: Open vents in an encapsulated crawl space introduce humid outdoor air, defeating the purpose. Seal vents when encapsulating.
- Skipping drainage: If the crawl space has standing water, a vapor barrier will float. Address drainage before installing the barrier.
- No maintenance plan: Inspect the vapor barrier annually for tears, displaced sections, or pooled water. Repair immediately.
Vapor Barrier and Existing Mold Prevention Systems
A vapor barrier works best as part of a comprehensive moisture control strategy. Combine it with:
- Proper grading: Ensure the ground around your foundation slopes away from the home at 6 inches per 10 feet
- Gutter maintenance: Direct downspouts at least 6 feet from the foundation
- Interior drainage: Install a sump pump if your crawl space has a history of water intrusion
- HVAC maintenance: Keep ductwork in the crawl space clean and properly insulated
- Ongoing monitoring: Place a digital hygrometer in the crawl space and check readings monthly
For a complete overview of prevention strategies, see our guide to mold prevention products that work alongside vapor barriers.
Frequently Asked Questions
How long does a crawl space vapor barrier last?
A 6-mil polyethylene ground cover typically lasts 5-10 years before requiring replacement. A professionally installed 20-mil reinforced encapsulation system lasts 15-25 years with annual inspections and minor repairs as needed.
Can I install a vapor barrier over existing mold?
No. Installing a vapor barrier over active mold traps the growth and can make the problem worse. Remove existing mold through proper remediation first, then install the barrier to prevent recurrence.
Do I still need a dehumidifier with a vapor barrier?
In many cases, yes. A vapor barrier blocks ground moisture but does not remove humidity already in the air. In climate zones with average summer humidity above 60%, a crawl space dehumidifier ensures relative humidity stays below the 55% threshold where mold cannot grow.
Is a crawl space vapor barrier a DIY project?
A basic ground cover is a manageable DIY project costing $85-170 in materials. Full encapsulation involving wall coverage, vent sealing, and dehumidifier installation is significantly more complex and is typically best handled by a certified installer who can ensure proper sealing and drainage.
Will a vapor barrier stop musty smells?
In most cases, yes. Musty odors originate from mold and mildew growth fueled by excess moisture. By reducing crawl space humidity from 70-90% down to 30-50%, a vapor barrier eliminates the conditions that produce those odors. If smells persist after installation, investigate for hidden mold on structural surfaces that may need direct treatment.
For more information on moisture control and mold prevention in enclosed spaces, review the EPA’s guide to mold, moisture, and your home.
Frequently Asked Questions
How does a crawl space vapor barrier prevent mold?
A crawl space vapor barrier works by creating a physical barrier that prevents moisture from the ground from evaporating into the crawl space air. This significantly reduces the humidity levels, which is a critical factor in preventing mold growth as mold requires moisture to thrive.
Is a vapor barrier alone enough to stop existing mold in a crawl space?
While a vapor barrier is excellent for preventing future mold growth, it is not designed to remediate existing mold. Any present mold issues must be professionally removed and the underlying moisture source addressed before installing a vapor barrier to ensure its effectiveness.
What type of vapor barrier is most effective for mold prevention?
For optimal mold prevention, a heavy-duty, reinforced polyethylene vapor barrier, typically 10-20 mil thick, is recommended. Thicker barriers offer superior durability and resistance to punctures, providing a more robust and long-lasting moisture seal.

Can a vapor barrier improve the air quality in my home?
Yes, by preventing mold growth and reducing humidity in the crawl space, a vapor barrier can significantly improve the air quality within your home. Less moisture means fewer mold spores and other allergens circulating, leading to a healthier indoor environment.
How long does a crawl space vapor barrier last?
A properly installed, high-quality crawl space vapor barrier can last for many years, often 10-20 years or even longer. Its longevity depends on the material’s thickness, installation quality, and whether it’s protected from damage.
Are there any downsides to installing a crawl space vapor barrier?
The primary ‘downside’ is the initial investment cost for materials and professional installation. However, the long-term benefits of mold prevention, improved air quality, and potential energy savings typically outweigh this upfront expense, making it a sound investment for your home’s health.
These statements have not been evaluated by the Food and Drug Administration. This information is not intended to diagnose, treat, cure, or prevent any disease. Content is for informational purposes only and is not medical advice; consult a qualified healthcare provider before starting any supplement. As an Amazon Associate we earn from qualifying purchases.