Mold on Drywall Ceiling: Complete Repair Guide
Disclosure: As an Amazon Associate, I earn from qualifying purchases. This guide contains affiliate links marked with *. If you buy through them, I may earn a small commission at no extra cost to you.
Is It Dangerous? Can You DIY It?
Mold on a drywall ceiling is a health hazard and a structural concern, but you can safely handle small outbreaks yourself. The key is knowing the difference between a surface problem and a hidden infestation.
A patch of mold smaller than a dinner plate (under 3 square feet per EPA guidelines) on a drywall ceiling is usually safe for a homeowner to clean with the right products and protective gear. Large areas, mold behind the ceiling, or mold caused by a sewage leak needs a professional remediation contractor. This guide covers the DIY-scope repairs.
Drywall is porous. Mold does not just sit on the surface. It sends roots (hyphae) into the paper facing and the gypsum core. That is why surface cleaning with bleach alone often fails. The mold grows back from deep within the material. A proper drywall ceiling repair requires the right cleaner, the right prep, and the right sealant on the other side.
Why Mold Grows on Your Ceiling
Mold needs three things to grow on a drywall ceiling: moisture, a food source, and the right temperature. Drywall is the food source. The paper facing on drywall is cellulose, and mold digests cellulose. That is why drywall ceilings are especially vulnerable.
The moisture source is usually one of these:
- Bathroom steam. Hot showers produce humid air that rises. Without a vent fan running during and for 30 minutes after a shower, that moisture condenses on the ceiling and feeds mold growth.
- Roof leaks. A slow roof leak drips water into the attic, which soaks through the ceiling drywall from above. The mold grows on the ceiling side, but the real moisture source is hidden.
- Plumbing leaks. A pipe in the ceiling or the floor above can leak for weeks before you notice. The first visible sign is often a brown water stain with black mold spots.
- Poor insulation. Cold spots on the ceiling from missing or wet insulation create condensation when warm indoor air contacts a cold drywall surface.
- High indoor humidity. Indoor humidity above 60 percent (ideal is 30 to 50 percent) creates enough ambient moisture for mold to grow on any surface.
Identify and fix the moisture source before you clean the mold. If you clean the mold but the leak is still there, it will come back within weeks.
What You Need: Products and PPE
Do not start without the right gear and the right chemicals. Using the wrong product wastes time and can make the problem worse.
Mold Cleaners (Pick One)
| Product | Best For | Active Ingredient |
|---|---|---|
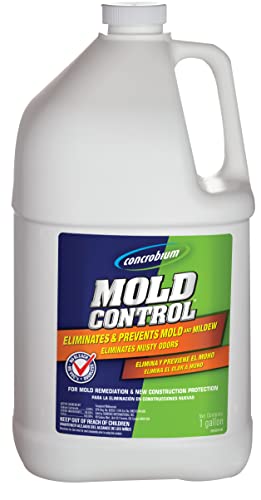
| Concrobium Mold Control * | Drywall ceilings, porous surfaces, prevention | Sodium carbonate (EPA registered) |
| RMR-86 Instant Mold Stain Remover * | Surface stains on non-porous surfaces, quick results | Sodium hypochlorite |
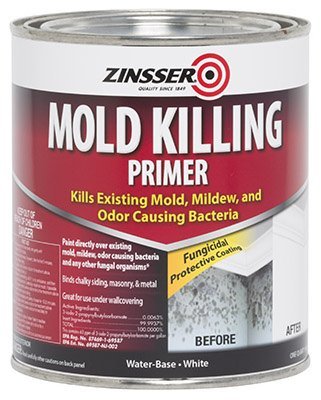
| Zinsser Mold Killing Primer * | After cleaning, before painting (seals surface) | Amine oxide fungicide (EPA Reg. 87469-1-69587) |
Concrobium Mold Control is our top pick for drywall ceilings. It is bleach-free, odorless, and VOC-free. It does not just kill mold on contact. It leaves a thin invisible crystalline residue that prevents regrowth. This matters on a ceiling because you cannot easily re-treat a ceiling every few months. The EPA registration confirms its efficacy against mold when used as directed.
RMR-86 is a fast stain remover for visible staining on the surface. It works in seconds with no scrubbing. However, it uses sodium hypochlorite (bleach chemistry), which works best on non-porous surfaces and may not reach growth inside drywall, and the fumes are strong. Open windows, wear a respirator, and keep the room ventilated. RMR-86 is best kept for surface staining and non-porous surfaces. Because it is a cleaner rather than a sealer, you still need a primer coat afterward to block regrowth.
Zinsser Mold Killing Primer is not a cleaner. You apply it after cleaning. It kills any remaining mold spores the cleaner missed and forms a fungicidal barrier on the drywall surface. This is the step that prevents the mold from coming back through the paint layer. Use this before repainting any previously moldy ceiling.
PPE (Do Not Skip)
- N95 or N100 respirator mask. Mold spores are airborne when you scrub. A dust mask is not enough.
- Safety goggles. Cleaning chemicals splash, especially when you spray overhead.
- Rubber or nitrile gloves. Mold cleaners are harsh on skin.
- Drop cloths and plastic sheeting. Cover furniture and floors below the work area.
Tools
- Spray bottle (if your cleaner does not come with one)
- Soft-bristle scrub brush or sponge (avoid wire brushes that gouge drywall paper)
- Clean rags or paper towels
- Paint roller and tray for the primer coat
- Bucket of clean water for rinsing
- Utility knife (if you need to cut and replace damaged drywall)
Step-by-Step Mold Removal on Drywall Ceilings
Step 1: Fix the Moisture Source
This is the most important step. If you skip it, every step after it is wasted effort. Look for the cause: a roof leak, a plumbing leak, a missing vent fan, or high humidity. Fix the leak before you clean. For ceiling leaks, repairing a roof or pipe leak may require a professional roofer or plumber. Do not proceed until the moisture source is stopped.
Step 2: Protect the Room
Clear the furniture below the work area. Lay drop cloths on the floor. Close doors and vents to prevent spore spread. Turn off the HVAC system. Wear your respirator, goggles, and gloves before you open the cleaner.
Step 3: Test the Mold Depth
Gently press a fingernail or the tip of a utility knife into the moldy drywall. If the surface is soft, crumbles, or feels spongy, the drywall has lost its structural integrity. Water damage has penetrated the gypsum core. Cleaning the surface will not fix it. You need to cut out and replace the affected section. Skip to the replacement section below. If the drywall is still hard and solid, proceed with cleaning.
Step 4: Apply the Mold Cleaner
If using Concrobium, spray the affected area generously so the solution pools on the surface. Let it sit for 5 to 10 minutes. The solution works on the surface and encapsulates the spores; it is not shown to reach growth deep inside the drywall. Do not wipe during the dwell time. The drying process forms the protective crystalline barrier.
If using RMR-86, spray the mold stain directly. You will see the stain begin to fade within seconds. Do not scrub. Let it sit for 30 to 60 seconds, then blot with a clean rag. Do not rinse. The chemical keeps working after you blot.
Step 5: Scrub Gently (If Needed)
For stubborn residue, use a soft-bristle brush or sponge dipped in clean water. Scrub gently in a circular motion. Drywall paper is fragile when wet. Scrubbing too hard tears the paper face, which ruins the surface and requires patching. Rinse the sponge frequently in clean water.
Step 6: Dry Thoroughly
Use clean towels to blot excess moisture from the ceiling. Open windows and run fans to dry the area completely. Wait 24 to 48 hours for the drywall to dry to its core. Do not skip this wait. Painting or priming over damp drywall traps moisture and guarantees mold regrowth behind the paint.
Step 7: Apply Zinsser Mold Killing Primer
Once the ceiling is bone dry, roll on a coat of Zinsser Mold Killing Primer over the cleaned area. Extend the primer at least 12 inches past the edge of the visible mold stain. This fungicidal sealant kills any remaining spores and prevents regrowth through the paint layer. The EPA registration number 87469-1-69587 on the label confirms it meets the standard for mold-proofing interior surfaces.
Step 8: Repaint with Mold-Resistant Paint
After the primer dries (follow the label cure time, typically 1 to 4 hours), paint the ceiling with a mold-resistant paint. Look for paint labeled with a mildewcide additive. Bathroom-specific ceiling paints contain these additives. A second coat of primer or paint adds extra protection.
When the Ceiling Must Be Replaced, Not Cleaned
Cleaning only works when the drywall is structurally sound. You must cut out and replace sections of ceiling drywall if:
- The drywall is soft or crumbly. Press on it. If your finger leaves a dent, the gypsum core is waterlogged and cannot be saved.
- The mold covers more than 10 square feet. At that size, the growth has likely penetrated deep into multiple drywall panels. Per EPA guidelines, professional remediation is recommended for areas over 10 square feet.
- The mold is behind the ceiling. If you see daylight through a crack or the area bulges downward, the mold is growing on the unseen side of the drywall. Cleaning the visible side does nothing.
- The ceiling has been wet for more than 48 hours. Drywall wicks moisture like a sponge. After 48 hours, mold has likely colonized the entire panel, not just the surface stain.
To replace a section of ceiling drywall: cut a clean rectangle around the affected area with a utility knife (cut through the paper face, snap the gypsum, cut the back paper), remove the damaged piece, check the insulation and framing for mold, treat any mold on the framing with Concrobium, install a new drywall patch, tape the seams with drywall tape and joint compound, sand smooth, prime with Zinsser Mold Killing Primer, and repaint.
Preventing Mold from Coming Back
Prevention is cheaper and easier than remediation. Address these factors to keep your ceiling mold-free:
- Run the bathroom vent fan. Run it during every shower and for 30 minutes after. If you do not have a vent fan, install one that vents to the outside (not into the attic).
- Keep indoor humidity below 50 percent. A hygrometer costs under $10. If your humidity consistently stays above 60 percent, run a dehumidifier.
- Fix roof and plumbing leaks immediately. A small drip that seems harmless creates a moisture reservoir in the attic or ceiling cavity that feeds mold for months.
- Insulate the ceiling properly. Cold ceilings from missing attic insulation cause condensation. Make sure the attic has adequate insulation between the ceiling joists.
- Use a mold-resistant paint. When repainting a ceiling, use paint with a mildewcide additive. Bathroom paints and kitchen paints often have these built in.
- Install a ceiling fan. Moving air reduces surface condensation. A ceiling fan running on low year-round keeps the air circulated and reduces dead spots where mold establishes.
When to Call a Professional
Some situations are beyond the scope of a DIY repair. Call a licensed mold remediation contractor if:
- Area is larger than 10 square feet. Professional containment, negative air pressure, and HEPA filtration are needed for large areas to prevent mold spores from spreading through the home.
- HVAC system is involved. If you suspect mold has grown inside the ductwork or on the HVAC equipment, turning on the system at all spreads spores through every room.
- Someone in the home has respiratory issues. People with asthma, allergies, or compromised immune systems should not be in the home during mold remediation. A professional can schedule the work so the home is safe.
- You cannot find the moisture source. Mold that keeps coming back despite cleaning and sealing points to a hidden moisture problem. A professional with a moisture meter and thermal camera can find the leak without cutting holes.
- Sewage or gray water caused the mold. Category 2 and 3 water damage (from washing machines, dishwashers, toilets, or sewage backups) creates biohazard conditions. Professional remediation with antimicrobial treatment is required.
Frequently Asked Questions
Can I use bleach to clean mold off a drywall ceiling?
Bleach is not a reliable choice for drywall. It can kill surface mold, but it may not reach growth inside the material, and treated spores can recover and regrow. Removing badly affected drywall is the reliable fix. If you treat the surface, a purpose-made mold cleaner like Concrobium is an option; RMR-86 is better kept for non-porous surfaces.
How do I know if the mold is dangerous black mold?
The common black mold on ceilings is usually Cladosporium or Alternaria, not Stachybotrys chartarum (the toxic black mold). Regardless of species, any visible mold growth in a living space should be removed. The health risk comes from prolonged exposure to elevated spore counts, not the specific species. Wear PPE and remove it.
Do I need to repaint after cleaning mold from a ceiling?
Yes. Cleaning removes the visible mold, but microscopic spores remain in the drywall paper. If you do not seal the surface with a mold-killing primer, those spores will germinate again when humidity rises. Repainting with a mold-resistant top coat gives you the best protection against regrowth.

How long does it take for mold to grow back on a ceiling?
If you cleaned the surface but did not fix the moisture source, mold can reappear within 2 to 4 weeks. If you fixed the moisture source, applied a mold-killing primer, and painted with mold-resistant paint, the repair should last for years. Annual inspection of the ceiling, especially after rainy seasons, helps catch regrowth early.
Can I use Concrobium on painted ceilings?
Yes. Concrobium is safe on painted surfaces. It is bleach-free and will not damage the paint finish. Spray it on, let it dwell for 5 to 10 minutes, and blot dry. It leaves no sticky residue and does not require rinsing. On painted ceilings, the mold is usually growing on surface dirt and grime rather than inside the drywall, making cleaning even more effective.
These statements have not been evaluated by the Food and Drug Administration. This information is not intended to diagnose, treat, cure, or prevent any disease. Content is for informational purposes only and is not medical advice; consult a qualified healthcare provider before starting any supplement. As an Amazon Associate we earn from qualifying purchases.