Mold Under Vinyl Flooring: Signs, Removal, and Solutions
Dealing with mold under vinyl flooring is a common challenge for homeowners. Vinyl Flooring is found throughout homes, and when moisture gets involved, mold can take hold quickly. This guide covers everything you need to know about identifying, removing, and preventing mold on vinyl flooring, including when you can handle it yourself and when to call a professional. According to EPA Mold Cleanup Guide, controlling moisture is the key to preventing mold growth on all building materials.
Our reviews are based on aggregated verified buyer feedback, manufacturer specifications, ingredient analysis, and published expert opinion. Products are not independently purchased or tested by our team. We may earn a commission if you purchase through our links, at no extra cost to you. How We Review
Why Does Mold Grow on Vinyl Flooring?
Vinyl itself is non-porous, but moisture that gets trapped between vinyl and the subfloor creates a perfect mold environment. The adhesive used to install sheet vinyl and vinyl tiles can harbor mold. LVP (luxury vinyl plank) with foam underlayment can trap moisture.
How to Identify Mold on Vinyl Flooring
Musty smell with no visible mold, buckling or lifting vinyl edges, discoloration visible through translucent vinyl, moisture beading on surface (indicates moisture rising from below). Pull up a corner to check underneath.
Removal difficulty: Moderate
Can You Save Moldy Vinyl Flooring?
The vinyl itself may be reusable if it’s a click-lock LVP system. Sheet vinyl glued down usually needs replacement. The subfloor underneath is the real concern.
How to Remove Mold from Vinyl Flooring: Step-by-Step
Follow these steps carefully to remove mold from vinyl flooring safely and effectively. Always prioritize safety by wearing appropriate protective gear.
Step 1: Pull up vinyl flooring (save click-lock planks if in good condition)
Step 2: Remove any foam underlayment (discard if moldy)
Step 3: Scrape off adhesive residue from subfloor
Step 4: Treat subfloor with mold-killing solution
Step 5: Allow to dry completely (48-72 hours with dehumidifier)
Step 6: Address moisture source (concrete moisture, plumbing leak, etc.)
Step 7: Apply moisture barrier or sealer to subfloor
Step 8: Reinstall flooring only after moisture readings are acceptable
Recommended Products for Vinyl Flooring Mold Removal
These products are recommended for treating mold on vinyl flooring based on verified buyer reviews and manufacturer specifications:
How to Prevent Mold on Vinyl Flooring
Test concrete subfloor for moisture before installing vinyl (calcium chloride or relative humidity test). Use a proper moisture barrier under vinyl on concrete. Avoid glue-down vinyl on concrete slabs without moisture testing.
DIY vs. Professional Remediation
DIY for small areas. Professional for large areas or if mold has penetrated the subfloor. Moisture testing before reinstallation is critical.
Tools and Materials You’ll Need
Proper tools and materials are essential for safe and effective vinyl flooring mold removal. Having the right equipment before starting ensures the job is done correctly and minimizes health risks. Based on expert recommendations and verified buyer feedback, these tools provide the best results for vinyl flooring mold remediation.
| Tool/Material | Purpose | Where to Buy |
|---|---|---|
| N95 Respirator | Protects against mold spore inhalation during removal process | Amazon |
| HEPA Vacuum | Captures mold spores and prevents cross-contamination | Amazon |
| Mold Remover Spray | Kills mold on subfloor surfaces after vinyl removal | Amazon |
| Moisture Meter | Tests subfloor moisture levels before and after treatment | Amazon |
| Dehumidifier | Removes excess moisture during 48-72 hour drying period | Amazon |
| Plastic Sheeting | Isolates work area to prevent mold spore spread | Local Hardware Store |
| Floor Scraper | Removes adhesive residue from subfloor surfaces | Local Hardware Store |
| Safety Goggles | Eye protection from debris and chemical splashes | Local Hardware Store |
Detailed Step-by-Step Removal Process for Vinyl Flooring
This comprehensive process expands on the basic removal steps with specific techniques, safety precautions, and professional-grade methods. Following these detailed instructions ensures thorough mold removal while protecting health and property.
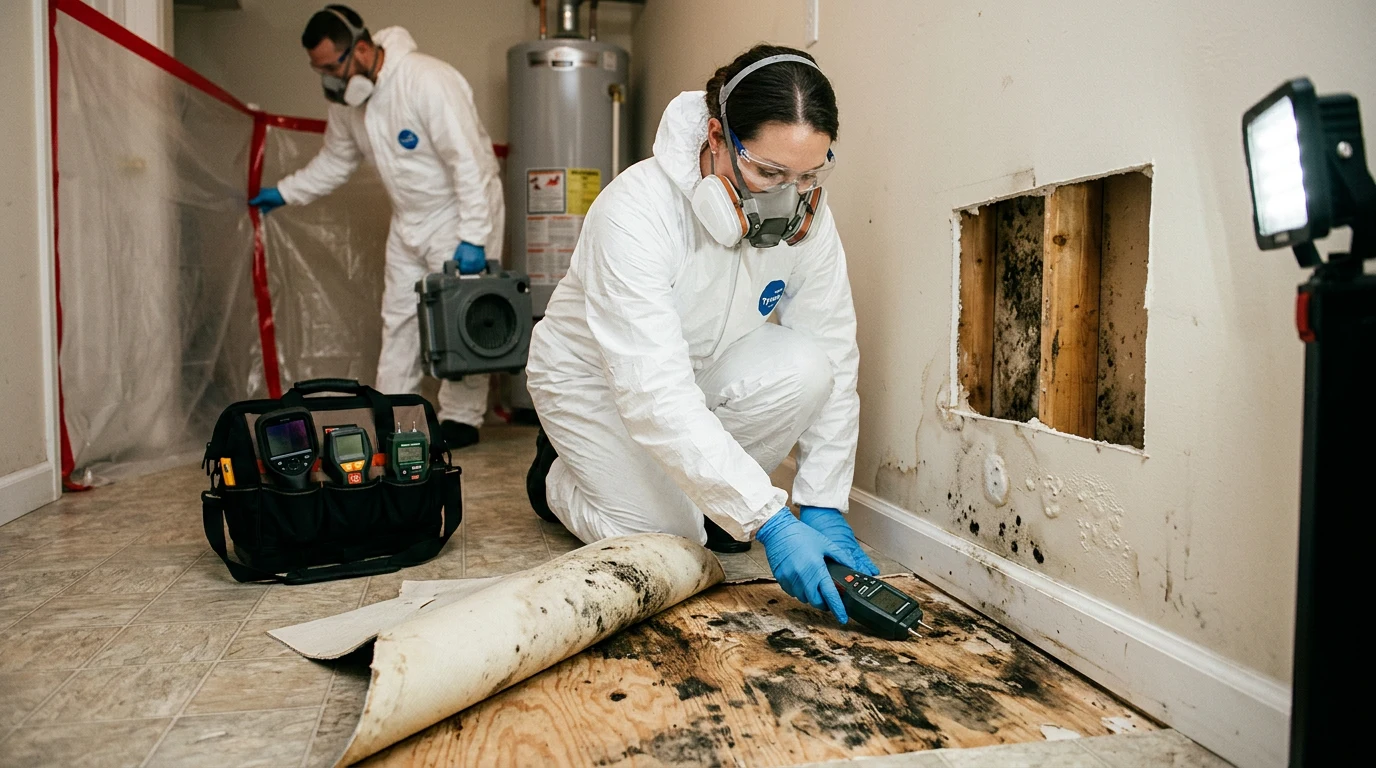
Safety Preparation: **Always wear an N95 respirator, safety goggles, and gloves before beginning any work.** Set up plastic sheeting to isolate the work area, preventing mold spores from spreading to other rooms. Turn off HVAC systems to prevent air circulation during remediation.
Step 1 – Remove Vinyl Flooring: Begin at room edges where vinyl typically shows the most damage. For click-lock LVP systems, carefully disconnect planks starting from the longest wall, working backwards toward the doorway. Save undamaged planks in a clean, dry area for potential reuse. For glued-down sheet vinyl, score the material into manageable 2-3 foot sections using a utility knife, then pull up systematically. Expect this process to take 2-4 hours for a standard room, depending on adhesive strength and flooring type.
Step 2 – Remove Underlayment: Foam or cork underlayment that shows any signs of moisture damage or mold growth must be completely removed and discarded. **Never attempt to clean moldy underlayment – replacement is always required.** Roll up contaminated underlayment carefully to minimize spore release, double-bag in heavy-duty plastic bags, and dispose of immediately.
Step 3 – Scrape Adhesive Residue: Use a floor scraper or putty knife to remove all adhesive residue from the subfloor. This step is critical because adhesive provides an organic food source for mold regrowth. Apply adhesive remover if residue proves stubborn, allowing 15-20 minutes for penetration before scraping. The subfloor should be completely smooth and residue-free before proceeding.
Step 4 – Apply Mold Treatment: Spray the entire subfloor surface with professional-grade mold remover, ensuring complete coverage including corners and edges where moisture typically accumulates. Allow the treatment to sit for the manufacturer’s recommended contact time, typically 10-15 minutes, before wiping clean with disposable cloths.
Step 5 – Drying Process: Position a dehumidifier in the treated area and maintain humidity levels below 50% for the entire 48-72 hour drying period. Use fans to promote air circulation, but ensure they blow air out of the contaminated area, not into clean spaces. **Do not rush this step – inadequate drying leads to mold recurrence.**
Step 6 – Address Moisture Sources: Use a moisture meter to test the subfloor thoroughly. Concrete subfloors should read below 4% moisture content, while wood subfloors should be below 12%. If readings exceed these levels, identify and repair the moisture source before proceeding – this may involve waterproofing, plumbing repairs, or HVAC adjustments.
Steps 7-8 – Final Preparation: Apply an appropriate moisture barrier or primer-sealer designed for your subfloor type. Allow complete curing as specified by the manufacturer, typically 24-48 hours. Only reinstall flooring after confirming moisture levels remain acceptable and the treated area shows no signs of recurring mold growth.
What to Expect: Before, During, and After Removal
Before Removal: Mold damage under vinyl flooring typically presents as musty odors without visible surface mold, vinyl edges that lift or buckle, and discoloration that shows through translucent flooring materials. Homeowners often notice soft or spongy spots when walking across affected areas. A professional assessment may reveal moisture readings exceeding safe levels and confirm the presence of mold colonies beneath the flooring.
During Removal: The removal process typically takes 1-3 days depending on room size and contamination extent. Day one involves vinyl removal and initial cleaning, which may release noticeable mold odors – this is normal and indicates the source is being addressed. The subfloor treatment phase on day two often reveals the full extent of damage, with some areas showing more severe staining or deterioration than initially apparent. The 48-72 hour drying period requires continuous dehumidifier operation and may temporarily increase utility costs.
After Successful Removal: Properly remediated areas should show no musty odors, moisture meter readings within normal ranges, and subfloors that appear clean and uniform in color. The treated space should feel dry underfoot, and any previous soft or spongy areas should be firm and stable. Monitoring for the first 30 days after reinstallation is crucial – any return of musty odors or visible moisture indicates incomplete remediation requiring immediate attention.
When to Call a Professional vs DIY
DIY Appropriate Situations: Homeowners can typically handle mold removal on vinyl flooring when the affected area is less than 10 square feet, the subfloor shows minimal structural damage, and moisture sources are easily identifiable and repairable. DIY remediation works best with click-lock LVP systems where individual planks can be removed and potentially reused. The contamination should be limited to surface-level mold without penetration into the subfloor material itself.
Professional Remediation Required: Contact certified mold remediation specialists when affected areas exceed 10 square feet, when mold has penetrated into or through the subfloor, or when structural damage is evident. Professional help is essential if the property has a history of flooding, if occupants experience health symptoms related to mold exposure, or if initial DIY attempts prove unsuccessful. Commercial properties and rental units should always use certified professionals to ensure compliance with health and safety regulations.
Cost Analysis: Understanding the financial implications helps homeowners make informed decisions about DIY versus professional remediation approaches.
| Service Type | Small Area (≤100 sq ft) | Medium Area (100-300 sq ft) | Large Area (300+ sq ft) |
|---|---|---|---|
| DIY Supplies Cost | $150-250 | $250-400 | $400-600 |
| Professional Service | $800-1,500 | $1,500-3,500 | $3,500-8,000+ |
| Time Investment (DIY) | 2-3 days | 3-5 days | 5-7 days |
| Professional Timeline | 1-2 days | 2-3 days | 3-5 days |
Professional services include liability insurance, warranty on work performed, and access to commercial-grade equipment. DIY approaches save money but require significant time investment and carry risks if not executed properly. **Professional remediation becomes cost-effective when factoring in potential health risks, property damage from incomplete removal, and the value of guaranteed results.**
Prevention Strategies for Vinyl Flooring
Pre-Installation Prevention: Proper moisture testing is the most critical prevention step for vinyl flooring installations. Conduct calcium chloride or relative humidity tests on concrete subfloors, waiting 72 hours for accurate readings. Concrete moisture should not exceed 3 pounds per 1,000 square feet over 24 hours using calcium chloride tests, or 75% relative humidity using in-situ probes. Apply appropriate moisture barriers or concrete sealers when test results approach these limits.
Seasonal Considerations: Monitor indoor humidity levels closely during high-humidity seasons, maintaining levels between 30-50% year-round using dehumidifiers when necessary. Spring and summer months require extra vigilance in basements and ground-level installations where concrete moisture transmission increases with soil saturation. Winter heating can create condensation issues if indoor humidity is not properly controlled.
Ongoing Monitoring: Perform monthly visual inspections focusing on room perimeters, areas near plumbing fixtures, and any locations where vinyl edges show previous lifting. Use a moisture meter quarterly to test subfloor conditions through small gaps or removable transition strips. Address any moisture readings above normal ranges immediately – early intervention prevents major mold problems.
Product Recommendations for Prevention: Install vapor barriers rated for your specific subfloor type, use 100% silicone caulk around room perimeters to prevent moisture infiltration, and consider upgrading to click-lock luxury vinyl plank systems that allow for easier inspection and maintenance compared to glued-down installations.
Related Materials and Cross-Contamination
Mold growth under vinyl flooring rarely occurs in isolation and often indicates moisture problems affecting adjacent building materials. Understanding these relationships helps homeowners address root causes rather than just surface symptoms.
Common Material Combinations: Vinyl flooring mold frequently coincides with mold growth on concrete subfloors, particularly in basements and ground-level installations. Wall bases and drywall at floor level often show contamination when moisture wicks upward from compromised subfloors. Wood subflooring beneath vinyl installations can develop extensive mold colonies that spread to floor joists and structural framing.
Cross-Contamination Patterns: Mold spores released during vinyl removal can contaminate nearby carpeted areas, HVAC systems, and porous materials throughout the affected space. Adjacent rooms connected by common subfloor systems may show secondary mold growth weeks or months after initial contamination. Tile and grout installations near affected vinyl areas often require simultaneous treatment to prevent re-contamination.
Comprehensive Assessment: Professional inspections should evaluate all materials within 10 feet of identified vinyl flooring mold, including wall cavities, insulation, and structural components that may harbor hidden colonies. This comprehensive approach prevents the common problem of recurring mold growth from untreated adjacent sources.
Frequently Asked Questions
How can you identify mold on vinyl flooring?
Mold on vinyl flooring is identified through several key indicators: persistent musty odors without visible surface mold, vinyl edges that buckle or lift from the subfloor, discoloration visible through translucent vinyl materials, and moisture beading on the surface indicating moisture rising from below. The most definitive identification method is lifting a corner of the vinyl to inspect the subfloor underneath for visible mold growth, staining, or moisture damage.
Is mold on vinyl flooring dangerous to health?
Yes, mold on vinyl flooring poses significant health risks by releasing airborne spores that can cause respiratory symptoms, allergic reactions, and other health complications. People with asthma, allergies, or compromised immune systems face higher risks of severe reactions. Even healthy individuals may experience symptoms including coughing, throat irritation, nasal congestion, and eye irritation when exposed to mold spores from contaminated vinyl flooring installations.
How much does it cost to remove mold from vinyl flooring?
DIY mold removal from vinyl flooring costs between $150-600 depending on area size and required supplies, while professional remediation ranges from $800-8,000+ based on contamination extent and room size. Small areas under 100 square feet typically cost $150-250 for DIY supplies versus $800-1,500 for professional service. Large areas exceeding 300 square feet require $400-600 in DIY materials compared to $3,500-8,000+ for professional remediation including subfloor treatment and moisture control.
Can you paint or seal over mold on vinyl flooring?
No, painting or sealing over mold on vinyl flooring is never recommended and will not solve the underlying problem. Mold growth under vinyl flooring requires complete removal of the contaminated material, thorough treatment of the affected subfloor, and elimination of moisture sources. Attempting to seal over mold allows continued growth beneath the surface and typically results in more extensive damage and higher remediation costs in the future.
How long does it take for mold to grow on vinyl flooring?
Mold can begin growing under vinyl flooring within 24-48 hours when moisture conditions are present, though visible signs typically appear after 7-10 days of sustained moisture exposure. The non-porous nature of vinyl traps moisture against the subfloor, creating ideal conditions for rapid mold development. Factors including temperature, humidity levels, organic material availability (such as adhesive), and ventilation affect growth rates, with optimal conditions allowing extensive mold colonies within 1-2 weeks.
What causes mold to grow on vinyl flooring?
Mold grows on vinyl flooring when moisture becomes trapped between the vinyl surface and the subfloor, creating an enclosed, humid environment. Common causes include concrete subfloor moisture transmission, plumbing leaks, flooding, inadequate moisture barriers during installation, and high indoor humidity levels. The adhesives used to install sheet vinyl and vinyl tiles provide organic food sources for mold growth, while foam underlayment beneath luxury vinyl planks can absorb and retain moisture.
Can vinyl flooring with mold underneath be saved and reused?
Click-lock luxury vinyl plank systems can often be saved and reused if the vinyl planks themselves show no damage and can be properly cleaned and disinfected. However, sheet vinyl that was glued down typically requires complete replacement due to adhesive contamination and difficulty achieving thorough cleaning. The subfloor condition is the primary concern – vinyl can only be safely reused if the underlying mold problem is completely resolved and the subfloor is properly treated and dried.
How can you prevent mold growth on vinyl flooring?
Prevent mold growth on vinyl flooring by conducting moisture testing on concrete subfloors before installation using calcium chloride or relative humidity tests, installing appropriate moisture barriers under vinyl installations on concrete surfaces, maintaining indoor humidity levels between 30-50%, and avoiding glue-down vinyl installations on concrete slabs without proper moisture testing. Regular monitoring with moisture meters and immediate attention to any signs of water infiltration or humidity problems are essential for long-term prevention.
When should you call a professional for vinyl flooring mold removal?
Call a professional for vinyl flooring mold removal when the affected area exceeds 10 square feet, when mold has penetrated into or through the subfloor material, when structural damage is evident, or when occupants experience health symptoms related to mold exposure. Professional remediation is also required for commercial properties, rental units, properties with flooding history, or situations where initial DIY attempts prove unsuccessful. Certified professionals have access to commercial-grade equipment and provide warranties on their work.
Advanced Remediation Products for Vinyl Flooring Mold
Professional-grade products provide superior results for vinyl flooring mold remediation, offering longer-lasting protection and more effective treatment than basic household cleaners. These products are specifically formulated for the unique challenges of subfloor mold treatment and moisture control.
- Concrobium Mold Control – EPA-registered mold treatment that crushes mold spores at the roots and leaves an antimicrobial barrier to prevent regrowth. Ideal for treating subfloors before vinyl reinstallation and safe for use around children and pets.
- Mold Encapsulant Sealer – Professional-grade sealer that permanently encapsulates mold stains and residue on concrete and wood subfloors. Creates a moisture-resistant barrier that prevents future mold penetration through porous surfaces.
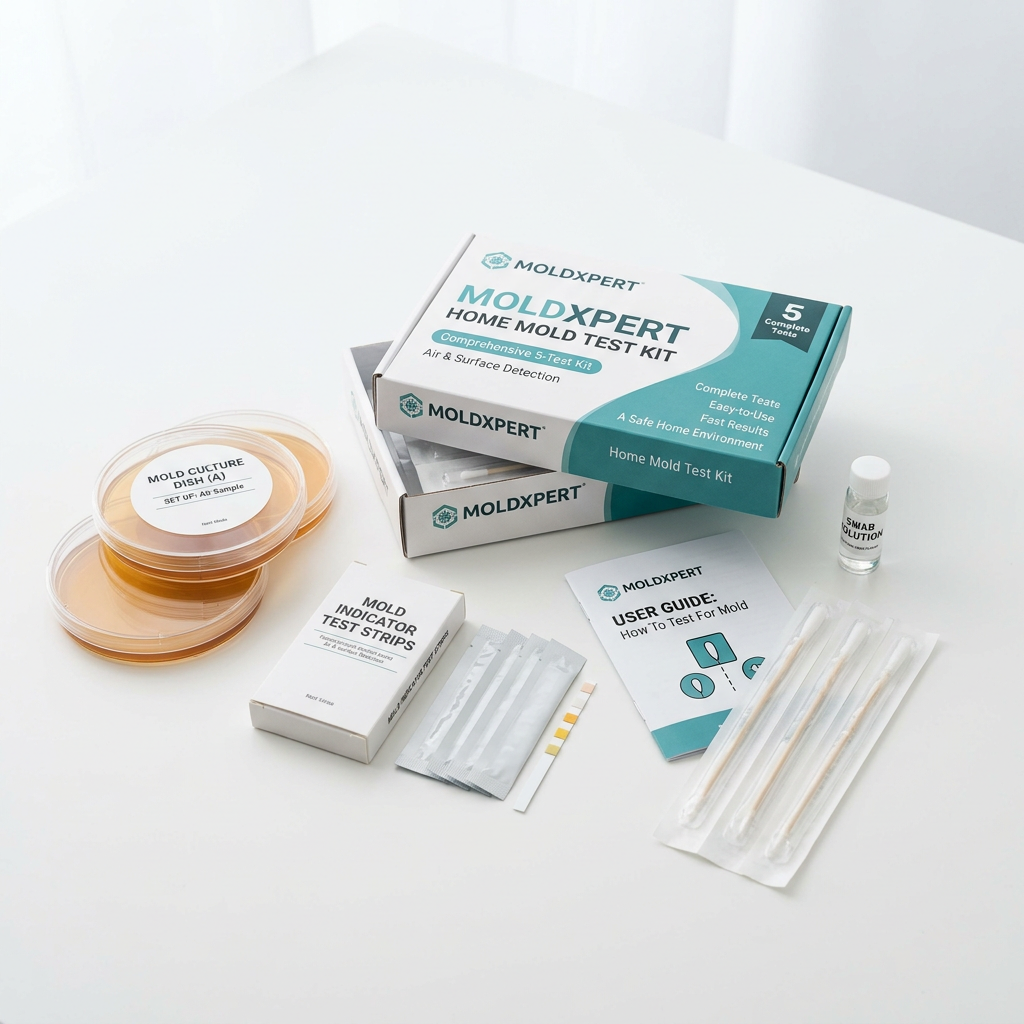
- Professional Mold Test Kit – Laboratory analysis provides definitive identification of mold species and contamination levels. Essential for determining remediation success and ensuring safe occupancy before flooring reinstallation.
- Digital Moisture Meter – Professional-grade meter with pin and pinless modes for accurate subfloor moisture measurement. Features data logging and multiple material settings for precise monitoring throughout the remediation process.
- HEPA Air Scrubber – Commercial-grade unit removes 99.97% of airborne mold spores during remediation work. Essential for preventing cross-contamination and maintaining air quality throughout the removal process.
- Industrial Dehumidifier – High-capacity unit designed for remediation work, capable of removing up to 70 pints of moisture daily. Features continuous drain operation and automatic humidity control for optimal drying conditions.