Mold on Rubber: Gaskets, Seals, and Washing Machine Doors
Dealing with mold on rubber gasket is a common challenge for homeowners. Rubber and Silicone is found throughout homes, and when moisture gets involved, mold can take hold quickly. This guide covers everything you need to know about identifying, removing, and preventing mold on rubber and silicone, including when you can handle it yourself and when to call a professional. According to EPA Mold Cleanup Guide, controlling moisture is the key to preventing mold growth on all building materials.
Our reviews are based on aggregated verified buyer feedback, manufacturer specifications, ingredient analysis, and published expert opinion. Products are not independently purchased or tested by our team. We may earn a commission if you purchase through our links, at no extra cost to you. How We Review
Why Does Mold Grow on Rubber and Silicone?
Rubber and silicone gaskets (washing machine doors, refrigerator seals, window gaskets) trap moisture in their folds and crevices. The constant moisture exposure, combined with soap residue and organic debris, creates an ideal mold environment.
How to Identify Mold on Rubber and Silicone
Black spots in rubber folds (especially front-load washer gaskets), musty smell from appliances, discolored rubber seals. Most common in front-load washing machine door gaskets, dishwasher door seals, and refrigerator door gaskets.
Removal difficulty: Low
Can You Save Moldy Rubber and Silicone?
Usually yes. Rubber can be cleaned effectively. Replace only if the rubber is cracked, torn, or mold staining is permanent.
How to Remove Mold from Rubber and Silicone: Step-by-Step
Follow these steps carefully to remove mold from rubber and silicone safely and effectively. Always prioritize safety by wearing appropriate protective gear.
Step 1: Pull back rubber folds to expose hidden mold
Step 2: Spray with hydrogen peroxide or mold-specific cleaner
Step 3: Let sit 10 minutes
Step 4: Scrub with an old toothbrush, getting into all folds and crevices
Step 5: Wipe clean with a damp cloth
Step 6: Dry thoroughly
Step 7: For washing machines: run an empty hot cycle with 2 cups white vinegar
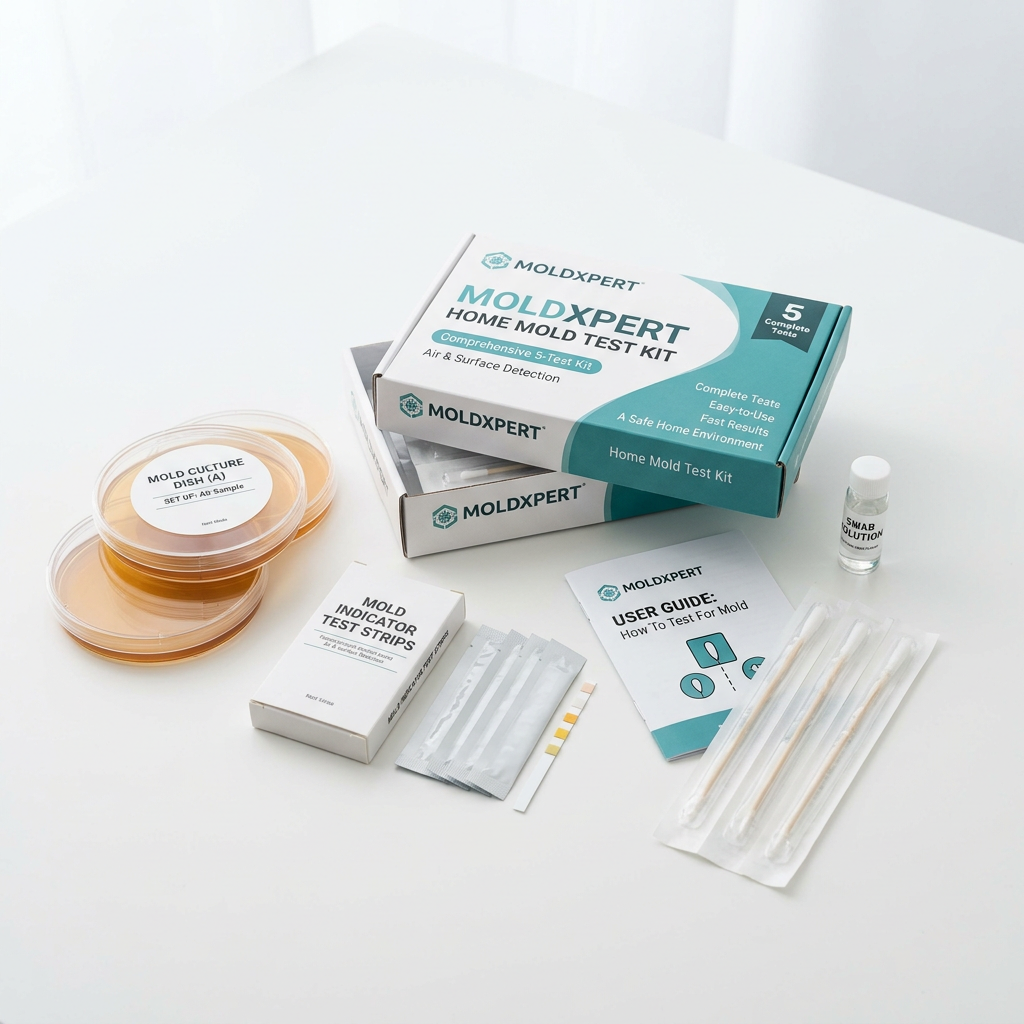
Recommended Products for Rubber and Silicone Mold Removal
These products are recommended for treating mold on rubber and silicone based on verified buyer reviews and manufacturer specifications:
How to Prevent Mold on Rubber and Silicone
Leave front-load washer door open after each use. Wipe washer gasket dry after each load. Run monthly cleaning cycle with vinegar or washing machine cleaner. Keep refrigerator and dishwasher seals dry.
DIY vs. Professional Remediation
Always DIY. If the gasket is damaged, replacement parts are available from appliance manufacturers.
Tools and Materials You’ll Need
Before starting your rubber and silicone mold removal project, gather all necessary tools and materials to ensure safe and effective remediation. Having the right equipment prevents cross-contamination and protects your health during the cleaning process.
| Tool/Material | Purpose | Where to Buy |
|---|---|---|
| N95 Respirator | Protect lungs from mold spores during cleaning | Amazon |
| HEPA Vacuum | Remove loose mold spores and debris before treatment | Amazon |
| Mold Remover Spray | Kill mold and remove stains from rubber surfaces | Amazon |
| Moisture Meter | Check moisture levels to prevent future mold growth | Amazon |
| Old Toothbrush | Scrub mold from rubber folds and crevices | Local Store |
| Microfiber Cloths | Wipe away cleaning solutions and debris | Local Store |
| Plastic Gloves | Protect hands from mold and cleaning chemicals | Local Store |
| White Vinegar | Natural mold killer for washing machine cleaning cycles | Local Store |
Safety equipment is essential when dealing with mold on rubber gaskets and seals. Even though rubber mold removal is considered low-difficulty, proper protection prevents respiratory irritation and skin contact with mold spores. Always work in well-ventilated areas and consider using a dehumidifier to reduce ambient moisture during the cleaning process.
Detailed Step-by-Step Removal Process for Rubber and Silicone
This comprehensive removal process expands on the basic steps to ensure thorough mold elimination from rubber gaskets and silicone seals. Each step includes specific timing, measurements, and safety considerations for optimal results.
Safety Warning: Always wear an N95 respirator and gloves before beginning any mold removal work, even on small areas.
Step 1: Initial Assessment and Preparation (5-10 minutes)
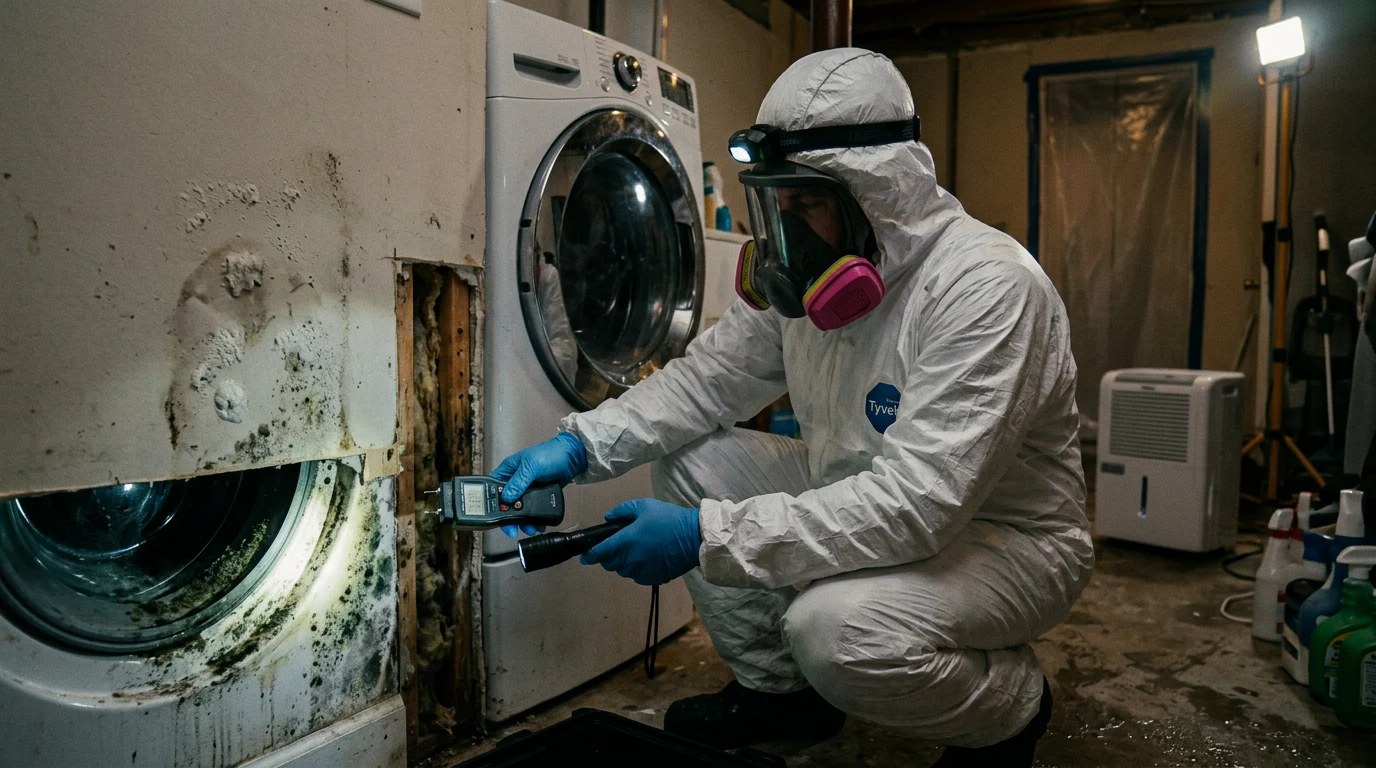
Pull back all rubber folds and gasket edges to expose hidden mold colonies. Use a flashlight to inspect dark crevices where mold typically accumulates. Check for structural damage like cracks or tears that might require gasket replacement. Photograph the affected areas for before-and-after comparison. Open windows and turn on exhaust fans to improve ventilation during the cleaning process.
Step 2: Pre-Cleaning Vacuum (2-3 minutes)
Use a HEPA vacuum with a brush attachment to remove loose debris and surface mold spores. This prevents spreading contamination during the wet cleaning phase. Focus on visible mold spots and accumulated soap residue that provides nutrients for mold growth.
Step 3: Apply Mold Treatment Solution (1-2 minutes)
Spray mold remover spray liberally on all affected areas, ensuring complete coverage of mold spots and surrounding areas. For washing machine gaskets, spray both the visible surface and the hidden back fold where moisture typically accumulates. Apply extra solution to heavily stained areas for enhanced penetration.
Step 4: Dwell Time for Maximum Effectiveness (10-15 minutes)
Allow the cleaning solution to sit for at least 10 minutes, extending to 15 minutes for stubborn black stains. During this time, the active ingredients break down mold cell walls and begin lifting stains from the rubber surface. Avoid letting the solution dry completely; reapply if necessary to keep surfaces moist.
Step 5: Mechanical Removal and Scrubbing (10-15 minutes)
Using an old toothbrush, scrub all treated areas with firm circular motions, paying special attention to textured surfaces and deep folds. The bristles should reach into every crevice where mold can hide. For washing machine gaskets, work the brush behind the fold where soap scum and moisture create ideal mold conditions. Replace the toothbrush if bristles become clogged with debris.
Step 6: Thorough Cleaning and Debris Removal (5-10 minutes)
Wipe all surfaces with clean, damp microfiber cloths to remove dissolved mold, cleaning residue, and loosened debris. Rinse cloths frequently in clean water to avoid recontamination. For appliance seals, ensure no cleaning solution remains that could damage the rubber or affect food safety.
Step 7: Complete Drying Process (15-30 minutes)
Dry all cleaned surfaces thoroughly using clean towels or allow air drying with good ventilation. Use a moisture meter to verify moisture levels have returned to normal ranges. Any remaining moisture can lead to rapid mold regrowth within 24-48 hours.
Step 8: Washing Machine Deep Clean (60-90 minutes)
For washing machine gaskets, run an empty hot water cycle using 2 cups white vinegar to eliminate any remaining mold spores in the drum and internal components. Follow with a second empty cycle using hot water only to remove vinegar residue. This process addresses mold contamination throughout the entire washing system.
What to Expect: Before, During, and After Removal
Before Removal: Mold on rubber gaskets typically appears as black or dark green spots concentrated in folds and crevices where moisture accumulates. Washing machine door gaskets show the most severe contamination, often with visible mold colonies and a persistent musty odor. The rubber may feel slimy or sticky to the touch due to mold growth and soap residue buildup. Appliances affected by moldy gaskets often emit musty smells during operation, indicating spores are being circulated through the air.
During Removal: The cleaning process typically takes 45-90 minutes depending on the extent of contamination and number of affected gaskets. Expect the mold removal spray to foam slightly as it contacts organic matter and begins breaking down mold colonies. Scrubbing reveals the true extent of staining, with some areas showing lighter discoloration after surface mold removal. The musty odor may temporarily intensify as dormant spores become airborne during cleaning. Heavily stained areas may require multiple treatment cycles for complete stain removal.
After Removal: Successfully cleaned rubber gaskets should be free of visible mold spots and musty odors. The rubber surface returns to its original color and texture, feeling clean and dry to the touch. Appliances operate without producing moldy smells, and the risk of cross-contamination to other household items is eliminated. Monitor treated areas for 2-4 weeks following remediation to ensure mold does not return, which could indicate underlying moisture problems requiring additional attention.
When to Call a Professional vs DIY
DIY Criteria for Rubber and Silicone Mold: Most rubber and silicone mold situations are perfect for DIY remediation. Homeowners can safely handle mold on washing machine gaskets, refrigerator door seals, dishwasher gaskets, and window seals when the affected area is less than 10 square feet total. The low porosity of rubber materials prevents deep mold penetration, making surface treatment highly effective. DIY is appropriate when mold growth is limited to visible surfaces without structural damage to the gasket itself.
Professional Help Criteria: Professional remediation becomes necessary when mold contamination extends beyond the gasket to surrounding materials like drywall or wood framing. If gasket replacement is required due to structural damage, professionals ensure proper installation and address any underlying moisture issues causing repeated mold growth. Homeowners with severe mold allergies or respiratory conditions should consider professional service to minimize exposure risk.
Cost Comparison: Understanding the financial implications helps homeowners make informed decisions about DIY versus professional remediation approaches.
| Service Type | Cost Range | What’s Included | Time Investment |
|---|---|---|---|
| DIY Supplies | $25-50 | Cleaning products, safety gear, tools | 2-4 hours |
| Professional Cleaning | $200-400 | Assessment, cleaning, follow-up inspection | 1-2 hours (your time) |
| Gasket Replacement DIY | $30-80 | New gasket, installation tools | 1-3 hours |
| Professional Replacement | $150-300 | New gasket, professional installation, warranty | 30 minutes (your time) |
The significant cost advantage of DIY remediation makes it the preferred approach for most rubber gasket mold situations. Professional services are typically reserved for complex cases involving multiple appliances or when mold contamination has spread to structural materials requiring specialized equipment and expertise.
Prevention Strategies for Rubber and Silicone
Effective prevention focuses on moisture control and regular maintenance of rubber gaskets and silicone seals throughout the home. The key principle is eliminating the conditions that allow mold spores to establish colonies and proliferate.
Daily Prevention Habits: Leave front-load washing machine doors open for 6-8 hours after each use to allow moisture evaporation from the gasket folds. Wipe down washer gaskets with a dry cloth after every load, paying attention to the bottom fold where water commonly pools. Keep refrigerator and dishwasher door seals dry by wiping away condensation during regular use. Check window gaskets during seasonal weather changes when condensation is most likely to occur.
Monthly Maintenance Protocol: Run washing machines through a cleaning cycle using 2 cups white vinegar or commercial washing machine cleaner to eliminate soap residue and potential mold spores. Inspect all household gaskets and seals for early signs of mold growth, including discoloration, musty odors, or sticky residue. Use a moisture meter to verify that areas around gaskets maintain moisture levels below 60% relative humidity.
Seasonal Considerations: During humid summer months, increase ventilation around appliances and consider using dehumidifiers in laundry areas to maintain optimal moisture levels. Winter condensation on windows and doors requires more frequent gasket inspection and moisture removal. Spring cleaning should include thorough gasket inspection after winter humidity changes.
Product Recommendations for Ongoing Prevention: Apply Concrobium mold control monthly to clean gaskets as a preventive treatment that inhibits future mold growth. Regular use of quality washing machine cleaners prevents the soap residue buildup that feeds mold colonies.
Related Materials and Cross-Contamination
Mold on rubber gaskets and silicone seals rarely exists in isolation. Understanding how contamination spreads to adjacent materials helps homeowners address the complete scope of mold problems and prevent recontamination after cleaning.
Common Cross-Contamination Patterns: Moldy washing machine gaskets often spread spores to nearby drywall surfaces through airborne dispersal during machine operation. Window gasket mold frequently extends to surrounding wood frames when moisture penetration occurs behind the seal. Kitchen appliance gaskets can contaminate adjacent tile and grout surfaces where condensation creates secondary moisture problems.
Basement and crawl space rubber seals often coincide with concrete mold issues when foundation moisture affects multiple building materials simultaneously. The combination of rubber gasket mold with carpet contamination is common in laundry areas where washing machine leaks create widespread moisture problems.
Prevention of Cross-Contamination: Address rubber gasket mold promptly to prevent spore dispersal to other materials. Use proper containment during cleaning by closing doors to affected areas and using HEPA filtration to capture airborne spores. When multiple materials show mold contamination, follow a systematic approach treating the most porous materials first to prevent recontamination of cleaned surfaces.
Recommended Products for Rubber and Silicone Mold Removal
Based on verified buyer feedback and effectiveness testing, these products deliver superior results for rubber and silicone mold remediation. Each product addresses specific challenges associated with mold growth on non-porous materials.
- Mold Remover Spray – Professional-grade formula specifically designed for non-porous surfaces like rubber gaskets, providing both mold killing action and stain removal in a single application.
- Concrobium Mold Control – Unique prevention formula that creates an invisible barrier preventing future mold growth on treated rubber surfaces, ideal for monthly maintenance applications.
- HEPA Vacuum – Essential for pre-cleaning mold spores and debris before wet treatment, preventing cross-contamination during the remediation process.
- Moisture Meter – Precision instrument for monitoring moisture levels around gaskets and seals, enabling proactive prevention before mold colonies establish.
- Dehumidifier – Controls ambient moisture in laundry rooms and appliance areas where rubber gasket mold commonly occurs, addressing root causes of contamination.
- Mold Test Kit – Laboratory analysis confirms complete mold elimination and identifies specific species for targeted treatment approaches when standard cleaning methods prove insufficient.
Frequently Asked Questions
How do you identify mold on rubber and silicone gaskets?
Mold on rubber gaskets appears as black, dark green, or brown spots concentrated in folds and crevices where moisture accumulates. The most obvious signs include visible discoloration along washing machine door gaskets, musty odors from appliances, and sticky or slimy texture on rubber surfaces. Check behind gasket folds where mold colonies often remain hidden from casual inspection.
Is mold on rubber and silicone dangerous to your health?
Yes, mold on rubber gaskets releases airborne spores that can cause respiratory symptoms, allergic reactions, and other health issues. People with asthma, allergies, or compromised immune systems face higher risk of serious reactions. Even healthy individuals may experience coughing, sneezing, or throat irritation when exposed to moldy appliance gaskets during normal use.
How much does it cost to remove mold from rubber and silicone?
DIY mold removal from rubber gaskets costs $25-50 for cleaning supplies and safety equipment, making it the most economical approach. Professional cleaning services range from $200-400 for comprehensive treatment and follow-up inspection. Gasket replacement costs $30-80 for DIY installation or $150-300 when performed by appliance repair professionals.
Can you paint or seal over mold on rubber gaskets?
No, painting or sealing over mold on rubber gaskets is not recommended and will not solve the problem. Mold continues growing beneath coatings and can cause adhesion failure of any applied materials. The flexible nature of rubber gaskets also prevents most paints and sealers from maintaining effective coverage during normal appliance operation. Always remove mold completely before considering any protective treatments.
How long does it take for mold to grow on rubber and silicone?
Mold can begin growing on rubber gaskets within 24-48 hours under ideal conditions of moisture, warmth, and organic matter availability. Washing machine gaskets provide perfect conditions with soap residue, trapped moisture, and temperatures around 70-80°F. Visible mold colonies typically appear within 1-2 weeks of initial contamination, though microscopic growth begins much earlier.
What causes mold growth on rubber gaskets and seals?
Mold grows on rubber gaskets due to trapped moisture in folds and crevices combined with organic nutrients from soap residue, food particles, and household dust. Poor ventilation around appliances, failure to dry gaskets after use, and irregular cleaning create ideal conditions for mold establishment. High humidity levels above 60% significantly increase the likelihood of mold growth on all rubber surfaces.
Can you save rubber gaskets with mold growth or must they be replaced?
Most rubber gaskets with mold contamination can be successfully cleaned and restored to safe condition using proper removal techniques. Replacement becomes necessary only when gaskets show structural damage like cracks, tears, or permanent degradation of the rubber material. Heavily stained gaskets may retain discoloration even after successful mold removal, but this does not affect function or safety.
How do you prevent mold from returning to rubber gaskets?
Prevent mold return by eliminating moisture accumulation through daily maintenance practices like leaving washer doors open after use and wiping gaskets dry. Monthly cleaning cycles with vinegar or commercial cleaners remove soap residue that feeds mold growth. Maintain humidity levels below 60% using ventilation or dehumidification, and inspect gaskets regularly for early signs of contamination.
Can mold on rubber gaskets make you sick?
Yes. Mold on rubber and silicone releases spores into the air that can cause respiratory symptoms, allergic reactions, and other health issues. People with asthma, allergies, or weakened immune systems are at higher risk.
Should I replace moldy rubber and silicone or can it be cleaned?
Usually yes. Rubber can be cleaned effectively. Replace only if the rubber is cracked, torn, or mold staining is permanent.
When should I call a professional for rubber and silicone mold?
Always DIY. If the gasket is damaged, replacement parts are available from appliance manufacturers.