Attic Mold Removal: Complete Guide
Attic mold removal is one of the most critical home remediation projects, yet one of the most frequently overlooked. Mold in the attic can spread across roof sheathing, rafters, and insulation for months or even years before a homeowner notices a musty smell, sees dark staining on ceiling surfaces, or discovers the problem during a home inspection. According to the EPA’s guidance on mold and moisture, poor attic ventilation and condensation are among the leading causes of residential mold problems, and the agency recommends addressing the moisture source before any cleaning or treatment begins.
This guide covers every aspect of attic mold, from identifying common species and understanding root causes to step-by-step remediation methods, professional cost breakdowns, and long-term prevention strategies. Whether dealing with a small patch of surface mold or widespread colonization across the entire roof deck, the information below provides a clear path forward.
Why Attics Are Prone to Mold Growth
Attics sit at the top of the building envelope where warm, moisture-laden air from the living space below meets cold roof surfaces during winter. This intersection of temperature and humidity creates condensation, which is the primary driver of attic mold growth. Understanding the specific conditions that cause mold to colonize attic spaces is essential before beginning any remediation work.
Condensation from Poor Ventilation
Every attic needs a balanced ventilation system that allows outside air to enter through soffit vents and exit through ridge vents, gable vents, or turbine vents. When soffit vents are blocked by insulation, when ridge vents are undersized, or when the attic lacks adequate net free area (NFA) for airflow, moisture accumulates on the underside of the roof sheathing. OSB and plywood sheathing absorb this condensation, and once the moisture content of the wood exceeds 19 to 20%, mold colonization begins rapidly. Research from the Building Science Corporation confirms that attics with less than 1 square foot of net free ventilation area per 150 square feet of attic floor are significantly more likely to develop condensation problems.
Bathroom and Kitchen Exhaust Venting Into the Attic
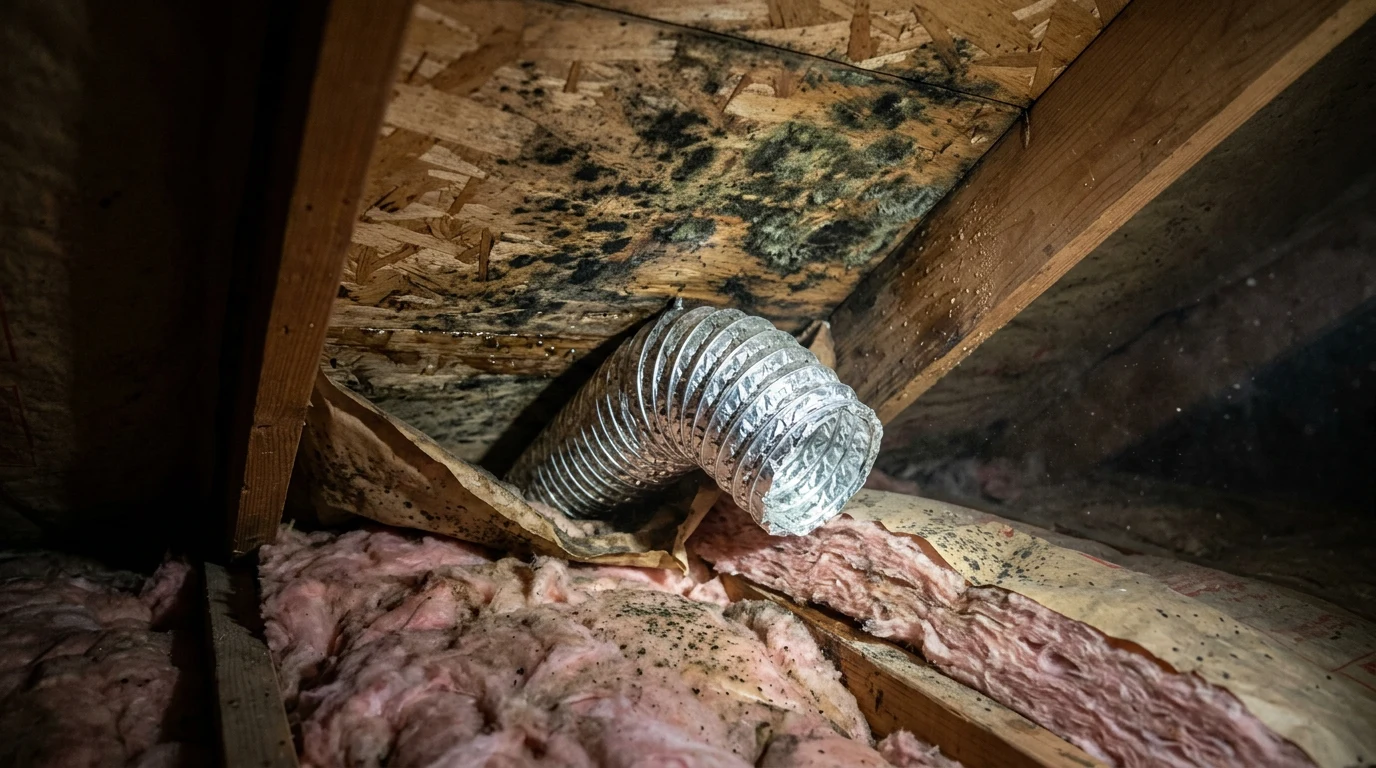
One of the most common causes of attic mold is bathroom exhaust fans that terminate inside the attic rather than venting directly to the exterior. Each shower produces a substantial amount of water vapor. When that moisture dumps into an enclosed attic space, it saturates the wood framing and sheathing. Kitchen range hoods that vent into the attic create similar problems, adding both moisture and grease to attic surfaces. Building codes universally require exhaust ducting to terminate outside the building envelope, but many older homes and poorly inspected renovations have exhaust fans dumping directly into attic cavities.
Roof Leaks and Ice Dams
Roof leaks introduce liquid water directly onto attic framing and insulation. Even a small leak around a plumbing vent boot, chimney flashing, or damaged shingle can create enough persistent moisture for mold to establish. In cold climates, ice dams form when heat escaping through the attic melts snow on the roof, which then refreezes at the eaves and forces water back under shingles. This water intrusion soaks roof sheathing and insulation from above, often in locations hidden from view.
Inadequate Insulation and Air Sealing
Gaps and penetrations in the attic floor allow warm, humid air from the living space to enter the attic continuously. Recessed light fixtures, plumbing penetrations, attic hatch openings, and gaps around ductwork and wiring all serve as pathways for moisture migration. Without proper air sealing at the attic floor plane, the warm air rises into the cold attic space and deposits its moisture on cold surfaces. A moisture meter can reveal elevated moisture levels in sheathing even when no visible mold is present.
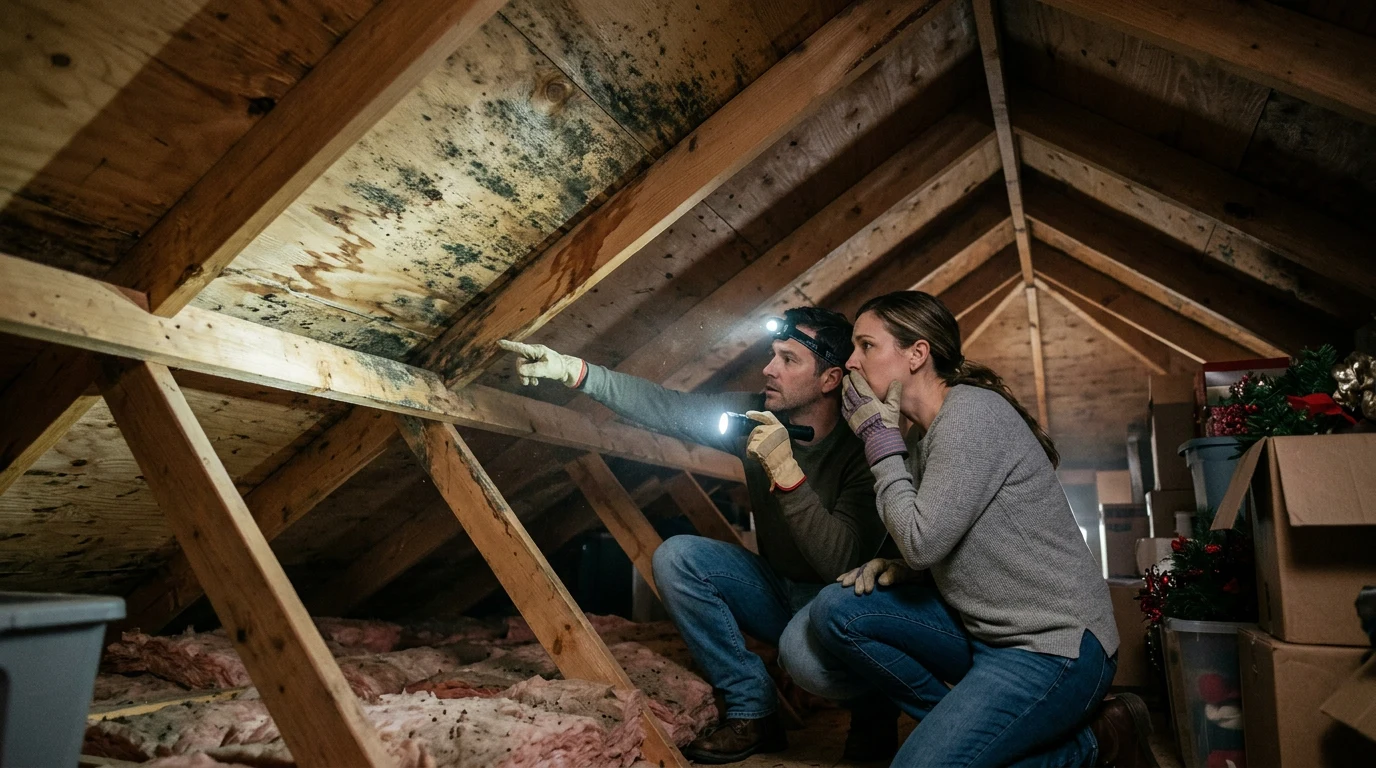
Identifying Mold in the Attic
Attic mold often goes undetected because most homeowners rarely enter the attic. Many cases are discovered during home inspections, real estate transactions, or when occupants notice musty odors or staining on upper floor ceilings. Knowing what to look for speeds up detection and prevents small problems from becoming large-scale remediation projects. For a comprehensive overview of mold indicators throughout the home, see the full guide on signs of mold in house.
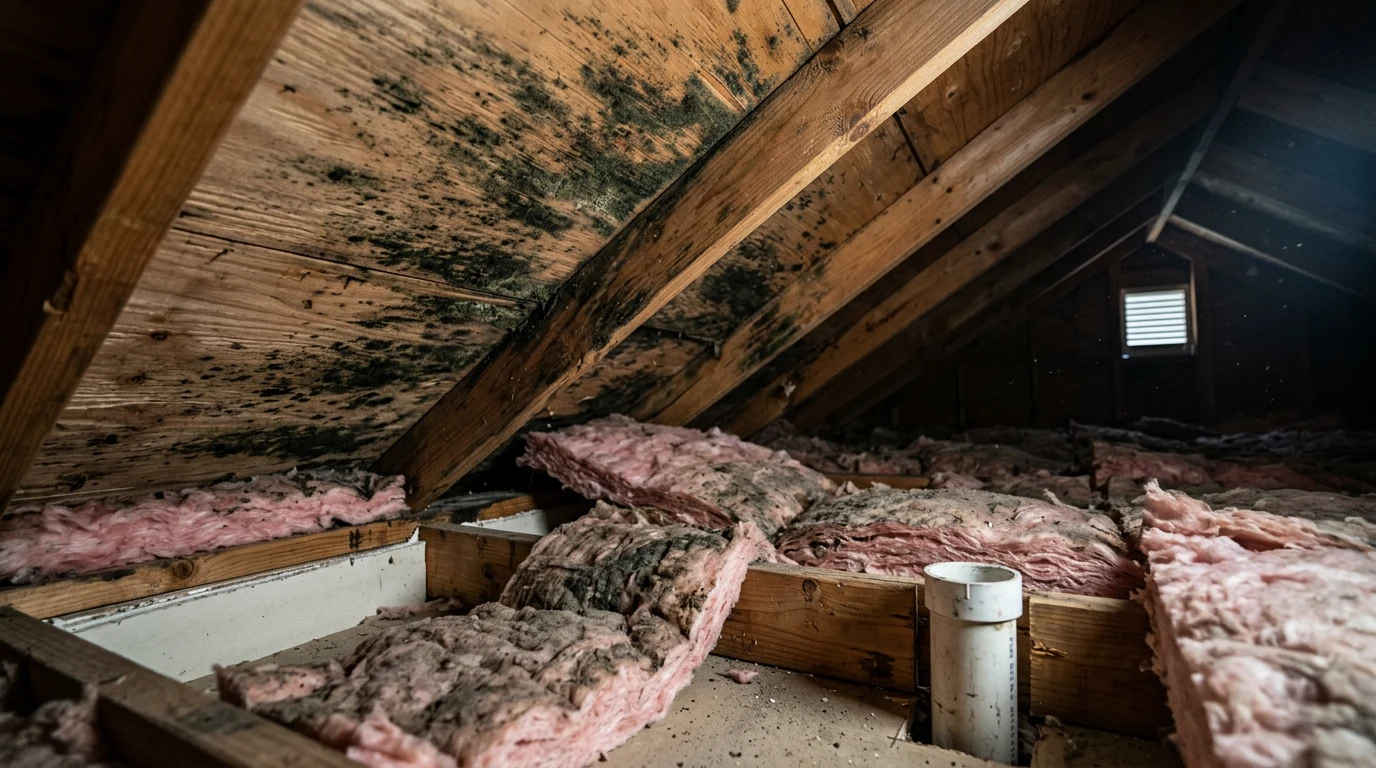
Visual Signs of Attic Mold
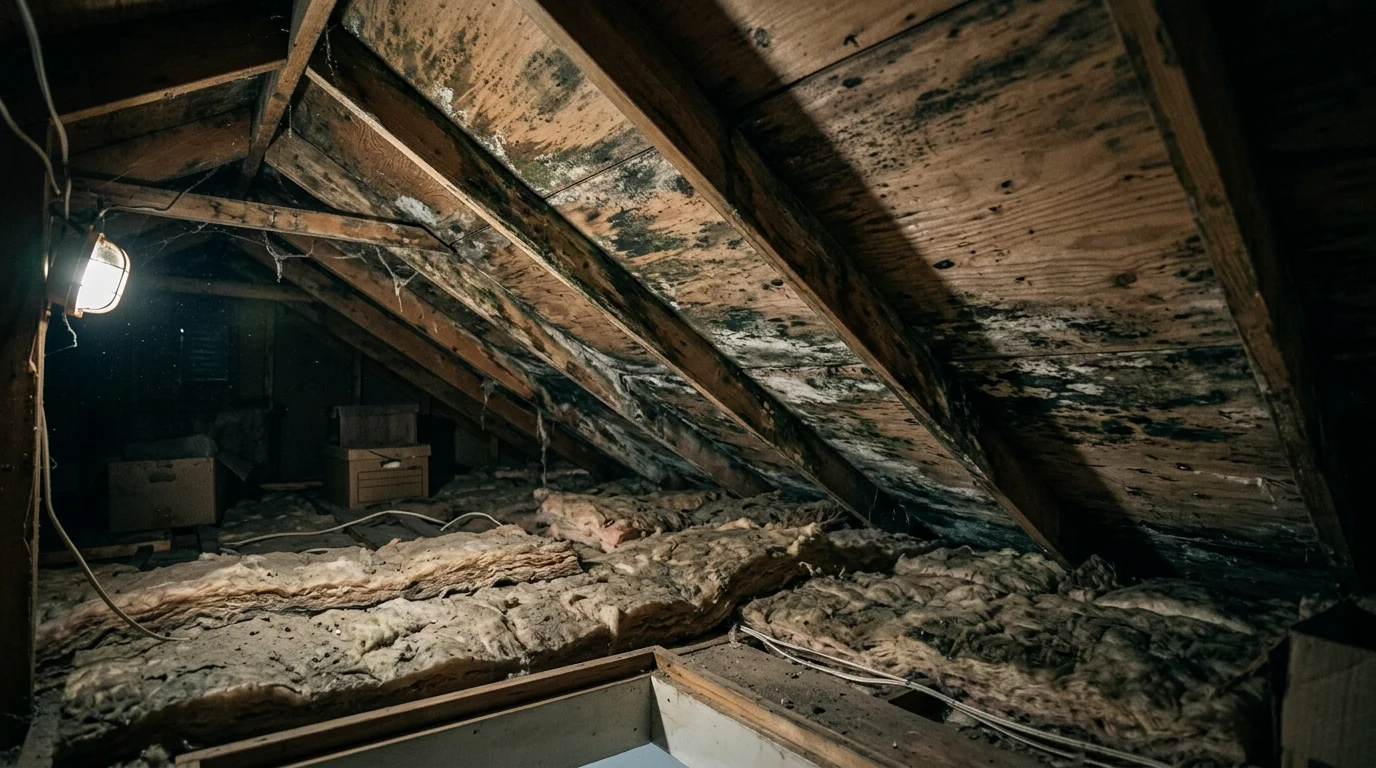
- Black or dark gray staining on roof sheathing: The most common visual indicator, caused by species such as Aspergillus niger, Cladosporium, or Stachybotrys chartarum
- White or light gray fuzzy growth on rafters and joists: Often Penicillium or Aspergillus species colonizing bare wood in high-humidity environments
- Green or blue-green patches on plywood or OSB: Indicates Trichoderma or Penicillium species, common on engineered wood products
- Dark staining around bathroom exhaust terminations: A concentrated moisture source that creates a visible mold ring on surrounding sheathing
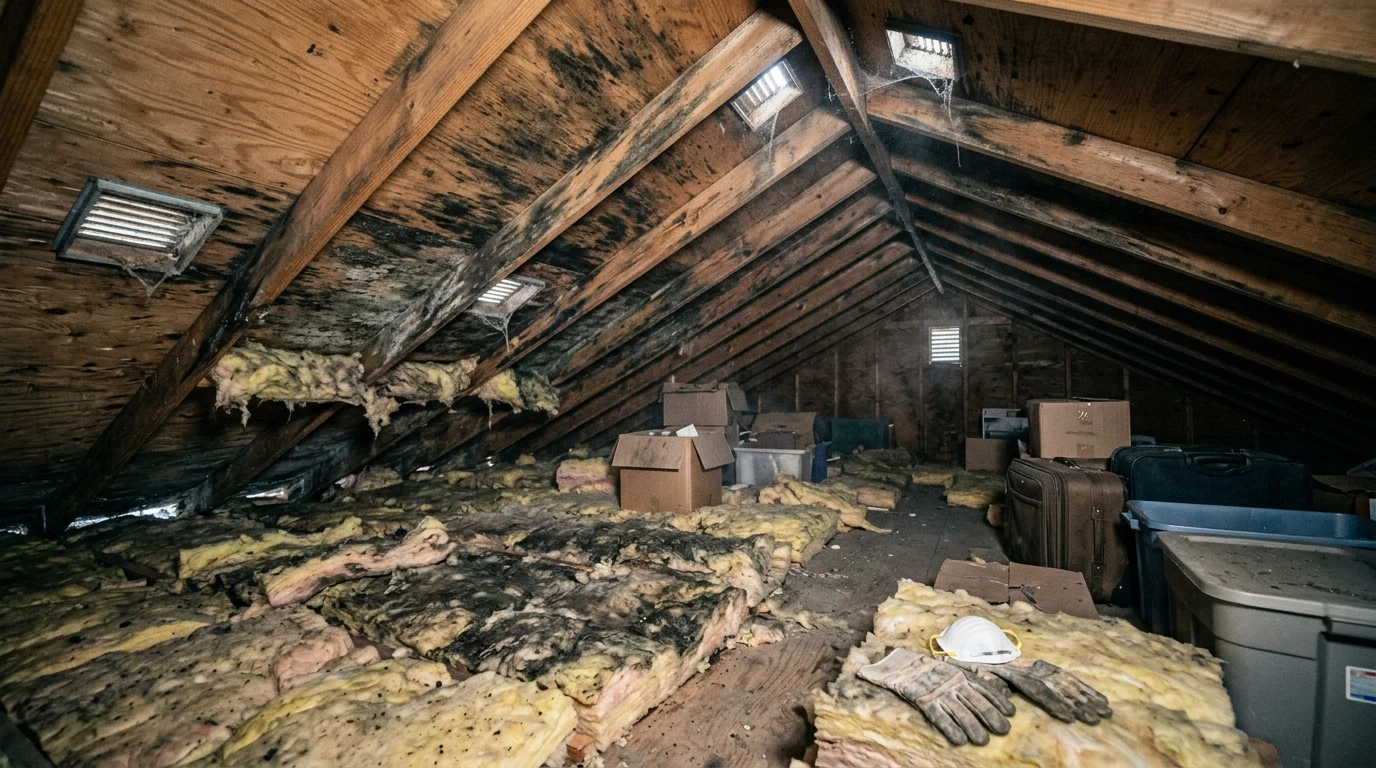
- Discolored or sagging insulation: Fiberglass batts or blown cellulose that has darkened, compressed, or developed a musty smell is likely harboring mold growth
- Frost or ice on the underside of roof sheathing in winter: Indicates severe condensation that will produce liquid water when temperatures rise, feeding mold growth
Musty Odors and Air Quality Indicators
A persistent musty smell on the upper floor of a home, especially in bedrooms with ceiling fixtures or recessed lighting, often signals attic mold. Microbial volatile organic compounds (MVOCs) produced by actively growing mold create that characteristic earthy, damp smell. These compounds are lightweight enough to migrate through ceiling penetrations, can openings, and HVAC registers, affecting indoor air quality throughout the home. Occupants may experience nasal congestion, throat irritation, or worsened allergy symptoms without realizing the source is the attic above.
When to Get a Professional Mold Inspection
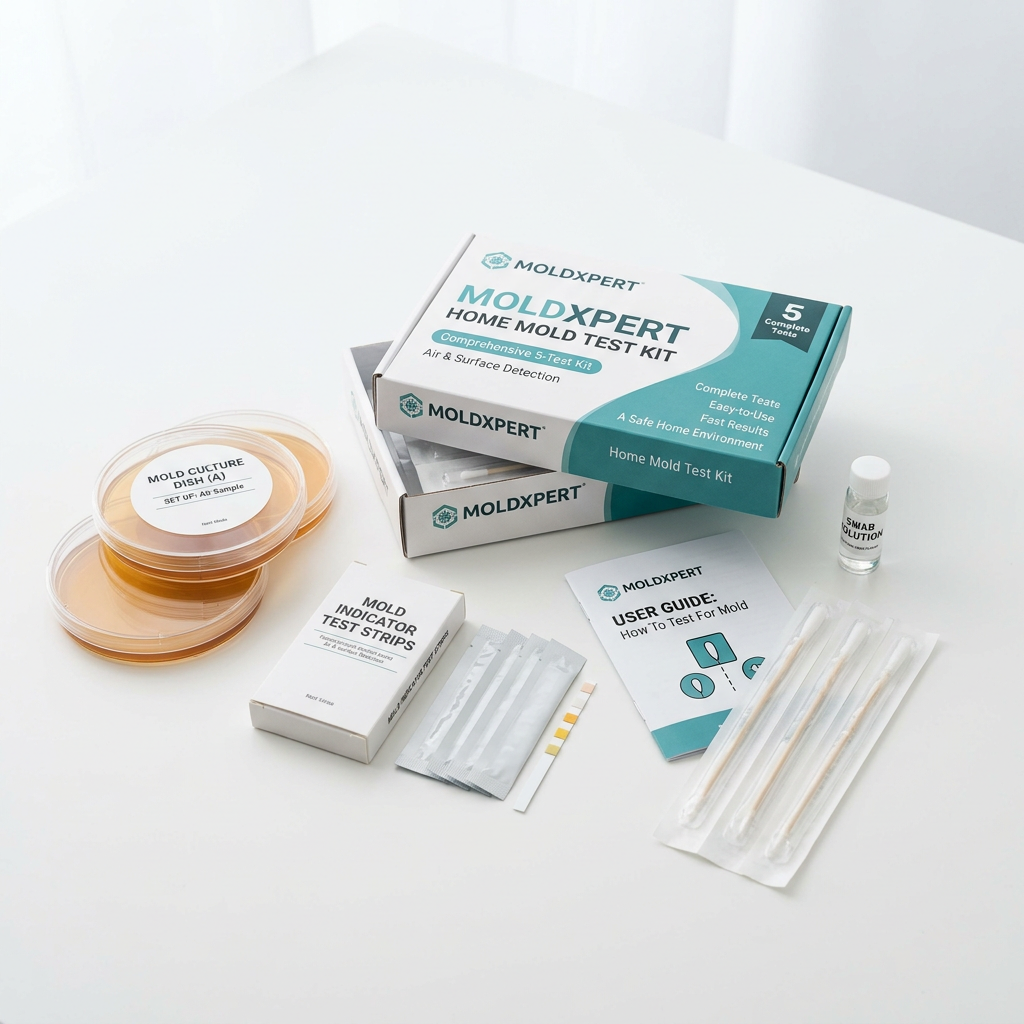
A professional mold inspection is recommended when the extent of attic mold is unclear, when the home is being bought or sold, or when occupants are experiencing health symptoms. A certified inspector (ACAC, MICRO, or IICRC certified) will take air samples inside and outside the attic, surface samples from suspicious areas, and moisture readings across sheathing and framing members. Lab analysis identifies mold species and spore concentrations, which helps determine whether DIY treatment is appropriate or professional remediation is needed. For more on testing approaches, see the mold testing guide.
Health Risks of Attic Mold
Mold in the attic poses health risks even when no one enters the attic space. Mold spores and fragments are microscopic, and the natural airflow patterns in a home draw attic air down through ceiling penetrations, HVAC systems, and structural gaps. The stack effect, combined with negative pressure created by exhaust fans and HVAC systems, can pull contaminated attic air into living spaces continuously.
Common health effects associated with attic mold exposure include upper respiratory irritation, chronic coughing and sneezing, nasal congestion, eye irritation, headaches, and exacerbation of asthma symptoms. Certain mold species found in attics, including Aspergillus fumigatus and Stachybotrys chartarum, produce mycotoxins that pose additional risks to immunocompromised individuals, young children, and elderly occupants. OSHA classifies mold remediation as a workplace hazard and recommends respiratory protection for anyone performing mold removal work.
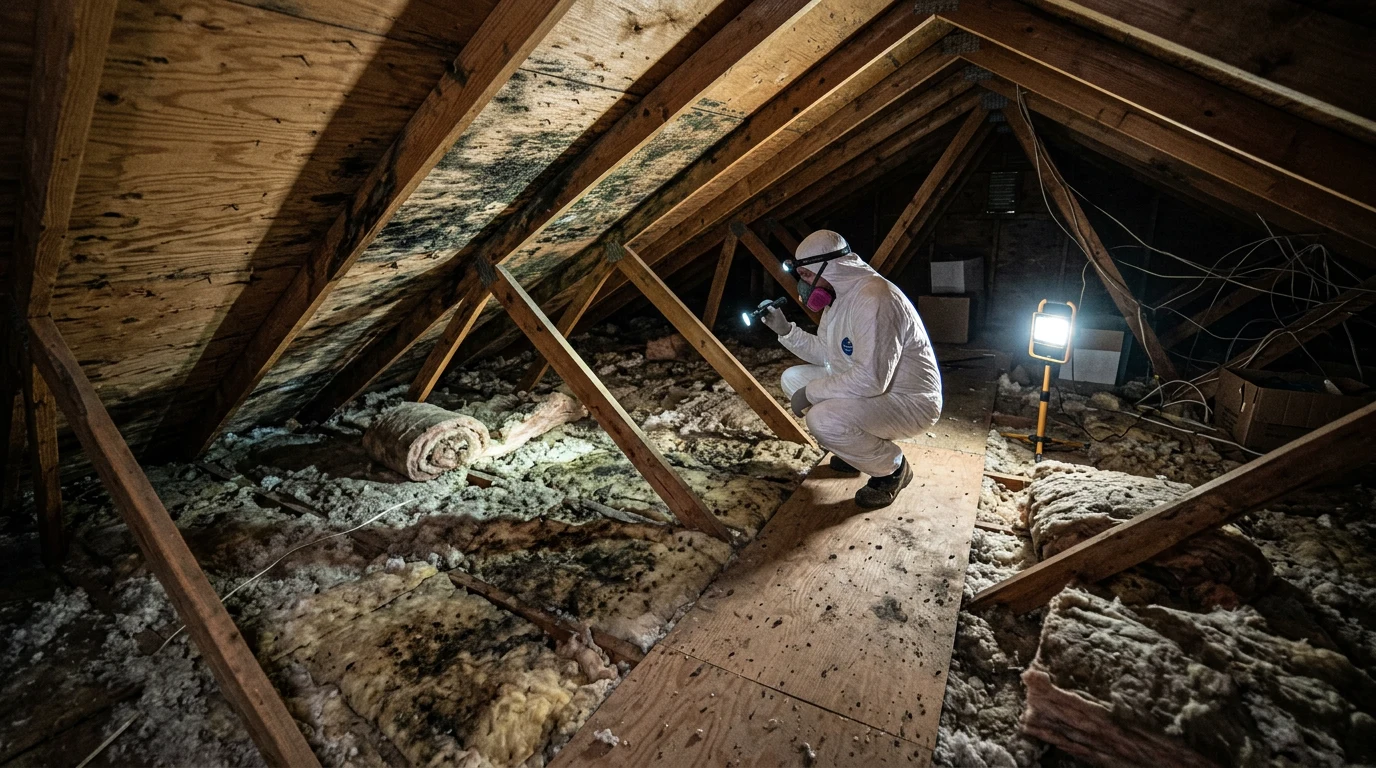
Safety Gear for Attic Mold Removal
Working in an attic during mold removal presents multiple hazards: airborne spore exposure, confined space conditions, high temperatures, and physical obstacles like low clearances, exposed nails, and unstable footing. Proper personal protective equipment (PPE) is non-negotiable before entering a mold-contaminated attic. A complete mold safety kit should include the following items.
- N95 respirator or half-face respirator with P100 filters: Minimum standard for mold spore protection; a half-face respirator is preferred for extended work in heavy contamination
- Safety goggles (non-vented): Prevents mold spores from contacting eyes during scrubbing and spraying
- Nitrile or rubber gloves extending to the forearm: Protects skin from chemical cleaning agents and mold contact
- Disposable Tyvek coveralls: Prevents mold spores from embedding in clothing and being carried into living spaces
- Knee pads: Essential for comfort and protection when working on attic joists
- Portable work light or headlamp: Attic spaces are poorly lit, and adequate visibility is critical for thorough treatment
DIY Attic Mold Removal: Step-by-Step Process
Small to moderate attic mold problems covering less than approximately 30 square feet of surface area can often be handled as a DIY project, following the approach outlined in the how to get rid of mold guide. Larger areas, structural damage, or HVAC contamination typically require professional remediation. The process below covers assessment, containment, treatment, and cleanup for a typical DIY attic mold project.
Step 1: Assess the Scope and Source
Before cleaning a single surface, identify the moisture source causing the mold. Treating mold without fixing the underlying moisture problem guarantees recurrence. Enter the attic with a flashlight and a moisture meter. Take readings across the roof sheathing, along rafters, and near any exhaust ducts or penetrations. Readings above 19% on wood surfaces indicate active moisture conditions. Check for disconnected bathroom exhaust ducts, blocked soffit vents, missing or damaged roof vent covers, and any signs of roof leaks.
Document the affected area with photographs, noting the approximate square footage, location relative to exhaust fans and vents, and the type of growth (surface staining vs. fuzzy active growth). This documentation helps determine whether the project is within DIY scope and provides a baseline for tracking remediation success.
Step 2: Fix the Moisture Source First
The moisture source must be corrected before or simultaneously with mold treatment. Common attic moisture source fixes include:
- Rerouting bathroom exhaust ducts: Disconnect any exhaust fans terminating in the attic and extend rigid or insulated flex duct directly to a roof cap or soffit exhaust vent
- Clearing blocked soffit vents: Pull back insulation that has fallen over or been pushed against soffit intake vents, and install baffles (also called rafter vents or chutes) to maintain a clear airflow channel from soffit to ridge
- Adding or upgrading ridge vents: If the attic relies solely on gable vents or static roof vents, adding a continuous ridge vent significantly improves ventilation balance
- Repairing roof leaks: Replace damaged shingles, reseal vent boots and flashing, and repair any ice dam damage
- Sealing air leaks at the attic floor: Use spray foam or caulk to seal around electrical penetrations, plumbing stacks, recessed light fixtures, and the attic hatch perimeter
Step 3: Set Up Containment
Containment prevents mold spores dislodged during cleaning from migrating into the living space below. Cover the attic access opening with 6-mil polyethylene sheeting, securing edges with painters tape. If the attic has a permanent stairway, hang a plastic curtain across the opening with a slit entry flap. Position a fan at an attic window or gable vent to create negative air pressure, drawing air out of the attic rather than allowing it to push down into the home. Turn off the HVAC system during remediation to prevent the air handler from distributing spores through the ductwork.
Step 4: Remove Contaminated Materials
Certain materials cannot be effectively cleaned and must be removed. Porous materials that have absorbed moisture and developed mold should be bagged and discarded:
- Fiberglass batt insulation: Cannot be cleaned; remove and bag any insulation showing mold growth, discoloration, or moisture damage
- Blown cellulose with visible mold: Heavily contaminated cellulose should be vacuumed out using a HEPA-filtered shop vacuum or removed by a professional insulation contractor
- Cardboard, paper, and stored items: Mold-contaminated porous items stored in the attic should be discarded
Bag all removed materials in heavy-duty trash bags and seal them before carrying through the living space. This prevents spore release during transport.
Step 5: Treat Mold on Structural Surfaces
For mold on wood roof sheathing, rafters, and joists, choose a treatment method based on the severity and extent of contamination.
For surface mold on wood (light to moderate): Apply a commercial mold remover spray designed for wood surfaces. Spray thoroughly and allow the product to dwell for the manufacturer-recommended time before scrubbing with a stiff-bristle brush. Work in manageable sections, wiping each area with clean rags after scrubbing. Change rags frequently to avoid spreading spores to clean surfaces.
For moderate to heavy mold coverage: Concrobium Mold Control is a widely recommended option for attic applications because it can be applied by spray or by mold fogger for large areas. Fogging distributes the solution as a fine mist that reaches into crevices, nail holes, and irregular sheathing surfaces that are difficult to treat by hand. After the product dries, it forms a thin antimicrobial film on the wood surface that inhibits future mold growth.
Important note on bleach: Bleach is not recommended for attic mold removal on wood. Bleach is water-based, and the water component soaks into porous wood while the active chlorine evaporates from the surface. This can actually feed mold growth deeper in the wood grain. The EPA does not recommend bleach for porous surfaces.
Step 6: HEPA Vacuum All Surfaces
After the treatment product has dried, HEPA vacuum all treated surfaces, including sheathing, rafters, joists, and any remaining insulation. HEPA filtration captures particles as small as 0.3 microns, which is critical for removing dead mold spores that remain allergenic and irritating even after treatment. Pay special attention to joints, nail lines, and edges where spore accumulation is heaviest.
Step 7: Apply Encapsulant (Optional but Recommended)
After cleaning and vacuuming, applying a mold encapsulant to the treated sheathing and framing provides an additional layer of protection. Encapsulants are specially formulated coatings that seal residual staining, prevent remaining spores from becoming airborne, and create a surface resistant to future mold colonization. This step is particularly valuable on roof sheathing where some surface discoloration remains after cleaning, as the staining is often permanent even when the mold is no longer viable.
Step 8: Replace Insulation and Restore
Once all treated surfaces are dry (verify with a moisture meter, targeting below 15% moisture content), replace any insulation that was removed. When reinstalling insulation, ensure that soffit baffles are in place to maintain airflow channels, and that the new insulation does not block any ventilation pathways. This is also an ideal time to upgrade insulation R-value if the existing insulation was below current code requirements.
Professional Attic Mold Remediation
Professional remediation is recommended when the mold-affected area exceeds 30 square feet, when structural damage is present, when HVAC components are contaminated, or when occupants have health sensitivities that make DIY work inadvisable. For a detailed breakdown of what professional services cost, see the mold removal cost and pricing guide.
What Professional Remediation Includes
A qualified mold remediation contractor (look for IICRC S520 certification or ACAC credentials) will typically follow a standardized protocol that includes:
- Initial assessment and moisture mapping: Using thermal imaging cameras and pin-type moisture meters to determine the full extent of water intrusion and mold growth
- Containment setup: Industrial-grade polyethylene barriers and negative air machines with HEPA filtration to isolate the work area
- HEPA air scrubbing: Continuous air filtration during the entire remediation process to capture airborne spores
- Mechanical mold removal: Soda blasting, dry ice blasting, or wire brush sanding of sheathing and framing to remove surface mold growth
- Antimicrobial treatment: Application of EPA-registered fungicidal solutions to all affected and adjacent surfaces
- Encapsulation: Coating treated wood surfaces with antimicrobial sealant
- Post-remediation verification (PRV): Independent air and surface sampling by a third-party inspector to confirm that mold levels have returned to acceptable thresholds
Attic Mold Removal Cost Breakdown
Professional attic mold remediation costs vary based on the size of the affected area, the severity of contamination, accessibility of the attic space, and regional labor rates. The following cost ranges reflect national averages based on aggregated contractor pricing data.
| Project Scope | Approximate Cost Range | What’s Included |
|---|---|---|
| Small area (under 30 sq ft) | $500 to $1,500 | Spot treatment, antimicrobial, basic containment |
| Moderate area (30 to 100 sq ft) | $1,500 to $4,000 | Full containment, treatment, HEPA air scrubbing, encapsulant |
| Full attic (100+ sq ft) | $4,000 to $10,000+ | Complete sheathing treatment, insulation removal/replacement, ventilation correction |
| Soda blasting (full attic) | $3,000 to $8,000 | Media blasting of all sheathing surfaces, antimicrobial, encapsulant |
| Ventilation correction (add-on) | $500 to $2,500 | Ridge vent installation, soffit vent clearing, baffle installation |
| Insulation replacement (add-on) | $1,500 to $4,000 | Removal of contaminated insulation and blown-in replacement |
Many homeowners insurance policies do not cover mold remediation unless the mold resulted from a sudden, covered water event (such as a burst pipe). Mold caused by long-term condensation, ventilation deficiencies, or deferred maintenance is typically excluded. Check the policy’s mold endorsement or exclusion clause before filing a claim.
Soda Blasting for Attic Mold Removal
Soda blasting has become a popular professional method for large-scale attic mold remediation. The process uses compressed air to propel sodium bicarbonate (baking soda) particles at mold-contaminated surfaces. The abrasive action of the media physically removes mold growth from wood sheathing and framing, while the alkaline nature of sodium bicarbonate creates an inhospitable pH environment for mold regrowth.
Advantages of soda blasting include its ability to treat large attic areas quickly, its effectiveness on rough-sawn lumber and OSB sheathing textures, and its relatively low environmental impact compared to chemical treatments. The primary disadvantage is that it generates significant dust (even with HEPA filtration), requires professional equipment and training, and typically costs more than manual treatment methods. Soda blasting is most cost-effective for attics with widespread sheathing contamination where manual scrubbing would be impractical.
Attic Ventilation: The Key to Mold Prevention
Correcting attic ventilation is the single most important step in preventing mold recurrence. Without adequate airflow to remove moisture from the attic space, mold will return regardless of how thoroughly the initial remediation was performed. A balanced ventilation system requires both intake vents (typically at the soffits) and exhaust vents (at or near the ridge).
Ventilation Standards and Calculations
The current building code standard (IRC R806) requires a minimum of 1 square foot of net free ventilation area for every 150 square feet of attic floor area. This ratio can be reduced to 1:300 when a vapor retarder is installed on the warm side of the ceiling, or when 50% to 80% of the ventilation is provided at the upper portion of the attic (ridge or near-ridge vents) with the remainder at the eaves. For a 1,500-square-foot attic, this translates to 10 square feet of NFA at the 1:150 ratio, or 5 square feet at the 1:300 ratio.
Types of Attic Ventilation
| Vent Type | Location | Function | Best For |
|---|---|---|---|
| Continuous soffit vents | Eaves/soffits | Air intake | All attic types (most effective intake method) |
| Ridge vent (continuous) | Roof peak | Air exhaust | Best exhaust option; works with all intake types |
| Gable vents | Gable end walls | Intake/exhaust | Supplemental; less effective than soffit-to-ridge |
| Turbine vents (whirlybirds) | Roof surface | Active exhaust | Moderate climates; wind-driven airflow |
| Powered attic ventilators | Roof or gable | Active exhaust | Use cautiously; can create negative pressure issues |
| Rafter baffles/chutes | Between rafters at eaves | Channel maintenance | Required whenever insulation is near soffit vents |
The most effective configuration is a continuous soffit vent paired with a continuous ridge vent, with rafter baffles installed in every rafter bay to maintain clear airflow channels from intake to exhaust. This creates uniform airflow across the entire underside of the roof deck, removing moisture before it can condense on sheathing surfaces.
Powered Attic Ventilators: Caution
Powered attic ventilators (electric or solar fans mounted on the roof) are sometimes marketed as mold prevention solutions. However, building scientists have documented several problems with powered ventilators. When they create strong negative pressure in the attic, they can pull conditioned air from the living space through ceiling penetrations, increasing energy costs and potentially drawing more moisture into the attic than they remove. In homes with atmospheric combustion appliances (furnaces, water heaters), powered attic fans can also create backdrafting conditions. Passive ventilation (soffit-to-ridge) is generally safer and more effective.
Common Attic Mold Species
Several mold species commonly colonize attic environments, each with different characteristics, health implications, and preferred growth conditions.
- Cladosporium: One of the most common attic molds. Appears as dark green to black growth on wood and insulation. Tolerates cooler temperatures than many species, making it well-suited to unheated attics. Allergenic but not typically toxigenic.
- Aspergillus: Multiple species in this genus colonize attic wood, including A. niger (black), A. flavus (yellow-green), and A. fumigatus. Some Aspergillus species produce mycotoxins and can cause aspergillosis in immunocompromised individuals.
- Penicillium: Appears as blue-green or white fuzzy growth on wood surfaces. Commonly found on wet plywood and OSB. Strong musty odor producer and significant allergen source.
- Stachybotrys chartarum (black mold): Requires chronically wet conditions and cellulose-rich substrates. Less common in attics than in water-damaged drywall, but can appear on sheathing with persistent roof leaks. Produces mycotoxins (satratoxins) that pose serious health concerns.
- Chaetomium: Often found alongside Stachybotrys on chronically wet cellulose. Produces a strong musty odor and is associated with the same wet conditions as black mold.
- Trichoderma: Green-white growth that commonly appears on damp wood. Some species are wood-decay fungi that actively break down cellulose, posing structural concerns beyond surface contamination.
Accurate species identification requires laboratory analysis of surface or air samples. Visual identification alone cannot determine species reliably, and professional testing is recommended when health concerns exist or when the species may influence remediation decisions.
Attic Mold and Real Estate Transactions
Attic mold is one of the most common findings during pre-purchase home inspections, and it can significantly impact real estate transactions. Buyers, sellers, and real estate professionals should understand how attic mold affects property value and negotiations.
In most states, sellers are required to disclose known mold issues, including previous remediation work. A professional mold remediation that includes post-remediation verification (with documented clearance testing by a third-party inspector) typically satisfies buyer and lender concerns. Lenders, particularly FHA and VA loan programs, may require evidence that mold has been professionally addressed before approving financing.
For sellers, addressing attic mold proactively before listing avoids price negotiations, delayed closings, and failed inspections. Remediation costs are almost always less than the price reduction buyers demand when mold is discovered during due diligence.
Preventing Attic Mold: Long-Term Strategies
Once remediation is complete, ongoing prevention is essential to avoid recurrence. Attic mold prevention focuses on controlling the two factors mold needs to grow: moisture and organic substrate. Since the wood framing and sheathing cannot be removed (they are the organic substrate), all prevention efforts target moisture control.
Annual Attic Inspection Checklist
Inspecting the attic twice a year (once in late fall before winter condensation season and once in early spring after) catches problems before they become remediation-scale issues.
- Check all soffit vents for blockage from insulation, debris, or bird nests
- Verify that bathroom and kitchen exhaust ducts terminate outside the building and all connections are sealed with foil tape or mastic
- Inspect roof sheathing for moisture staining, discoloration, or visible growth
- Take moisture meter readings at several points on the sheathing (target below 15%)
- Check around all roof penetrations (vent boots, chimney flashing, skylights) for signs of water intrusion
- Verify that rafter baffles are intact and insulation has not shifted over soffit vents
- Look for frost or ice on the underside of sheathing during winter inspections
- Confirm the attic hatch or door seals tightly and is insulated on the attic side
Ongoing Moisture Control Measures
- Run bathroom exhaust fans for at least 15 minutes after every shower: A timer switch ensures exhaust fans run long enough to clear moisture
- Maintain HVAC systems: Duct connections in the attic should be sealed with mastic, and ductwork should be insulated to prevent condensation on cold duct surfaces
- Control whole-house humidity: Keep interior relative humidity below 50% during heating season; a hygrometer provides ongoing monitoring
- Keep the attic access sealed and insulated: An unsealed attic hatch is a major pathway for warm, humid air to enter the attic
- Address roof maintenance promptly: Replace missing or damaged shingles, reseal vent boots and flashing, and clear debris from valleys and gutters
Attic Mold vs. Basement and Crawl Space Mold
While all three locations are common sites for mold growth, the causes and remediation approaches differ significantly. The basement mold remediation guide covers below-grade mold in detail, but the key differences are worth understanding.
| Factor | Attic | Basement | Crawl Space |
|---|---|---|---|
| Primary moisture source | Condensation, roof leaks | Groundwater, wall seepage | Ground moisture, condensation |
| Main affected surfaces | Roof sheathing, rafters | Walls, floors, stored items | Floor joists, subfloor |
| Ventilation strategy | Soffit-to-ridge passive flow | Dehumidification | Sealed + conditioned or dehumidified |
| Most common species | Cladosporium, Aspergillus | Aspergillus, Penicillium | Aspergillus, Penicillium |
| DIY feasibility | Moderate (access challenges) | Higher (standing access) | Low (confined space) |
| Average remediation cost | $1,500 to $6,000 | $1,500 to $5,000 | $2,000 to $8,000 |
Frequently Asked Questions
Can attic mold spread to the rest of the house?
Attic mold does not physically spread downward through solid ceilings, but mold spores are microscopic and readily travel through air currents. The stack effect pulls air from lower floors upward through the attic, and that same air recirculates through ceiling penetrations, HVAC ductwork, and gaps around fixtures. This means attic mold can increase airborne spore counts throughout the home, effectively contaminating indoor air quality on every level without the mold itself visibly growing on interior surfaces.
Does attic mold always need professional remediation?
Not always. Small areas of surface mold (under approximately 30 square feet) on accessible attic surfaces can often be treated as a DIY project using proper safety equipment and appropriate cleaning products. Professional remediation is recommended when the affected area is large, when structural wood shows signs of decay, when the HVAC system runs through the attic and may be contaminated, or when occupants have respiratory conditions or immune system sensitivities.
Will painting over attic mold solve the problem?
Painting over active mold growth does not kill the mold or stop it from spreading. Standard paint applied over mold will blister and peel as the mold continues to grow beneath it. The mold must be killed and removed first. After proper treatment, a dedicated mold encapsulant (not standard paint) can be applied to seal residual staining and provide ongoing antimicrobial protection. Encapsulants are formulated specifically to adhere to mold-treated surfaces and resist fungal growth.
How long does attic mold remediation take?
A small DIY attic mold project typically takes one to two days, including setup, treatment, drying time, and cleanup. Professional remediation of a moderately affected attic (50 to 100 square feet) usually requires two to three days. Full attic remediation with soda blasting, insulation replacement, and ventilation correction can take three to five days. Drying time after treatment adds an additional 24 to 48 hours before insulation replacement and final restoration.
Does homeowners insurance cover attic mold removal?
Most standard homeowners insurance policies exclude mold caused by long-term moisture issues, condensation, or maintenance neglect, which covers the majority of attic mold cases. Mold resulting from a sudden, covered peril (such as a tree branch puncturing the roof during a storm, allowing rain into the attic) may be covered. Some policies offer mold endorsements with coverage limits typically between $5,000 and $25,000. Review the specific mold clause in the policy and contact the insurer before assuming coverage.
Is black mold in the attic more dangerous than white or green mold?
Color alone does not determine danger. Many harmless molds are black (Cladosporium is the most common example), and some lighter-colored molds produce mycotoxins. The species commonly referred to as “black mold” (Stachybotrys chartarum) does produce harmful mycotoxins but requires chronically wet conditions that are more common in water-damaged drywall than in typical attic environments. Any extensive mold growth in an attic, regardless of color, should be addressed promptly because all mold species release spores and allergens that affect indoor air quality.
Can attic mold come back after remediation?
Attic mold will return if the moisture source is not corrected. The mold organism itself can be killed and removed, but mold spores are naturally present in all outdoor and indoor air. If the conditions that originally caused the mold (poor ventilation, exhaust fan issues, roof leaks, inadequate air sealing) are not fixed during or after remediation, new mold growth will establish on the same surfaces. Successful attic mold remediation always includes both mold treatment and moisture source correction.
Key Takeaways
- Attic mold is primarily caused by condensation from poor ventilation, bathroom exhaust fans venting into the attic, roof leaks, and inadequate air sealing at the attic floor
- Always identify and fix the moisture source before treating mold; cleaning without moisture correction guarantees recurrence
- DIY treatment is feasible for areas under 30 square feet using proper PPE, containment, and appropriate cleaning products
- Professional remediation is recommended for large-scale contamination, structural damage, or health-sensitive occupants
- Balanced attic ventilation (soffit intake paired with ridge exhaust) is the single most effective mold prevention measure
- Never use bleach on porous wood surfaces; use products specifically formulated for mold on wood
- Post-remediation verification testing by a third-party inspector confirms successful treatment
- Annual attic inspections catch moisture problems before they become mold problems